Get started
This section explains the following:
- To create your workspace
- To verify your email address
- To sign in to Zprox.Chat
- To reset a forgotten password
- To complete first-run setup
- To sign out
To create your workspace
Use this procedure if you're starting a brand-new workspace. If a colleague already created the workspace, ask them to add you as a user instead — see To add and manage users.
-
In your browser, go to your Zprox.Chat address. The landing page appears.
-
Select Get started. The Create your workspace page appears.
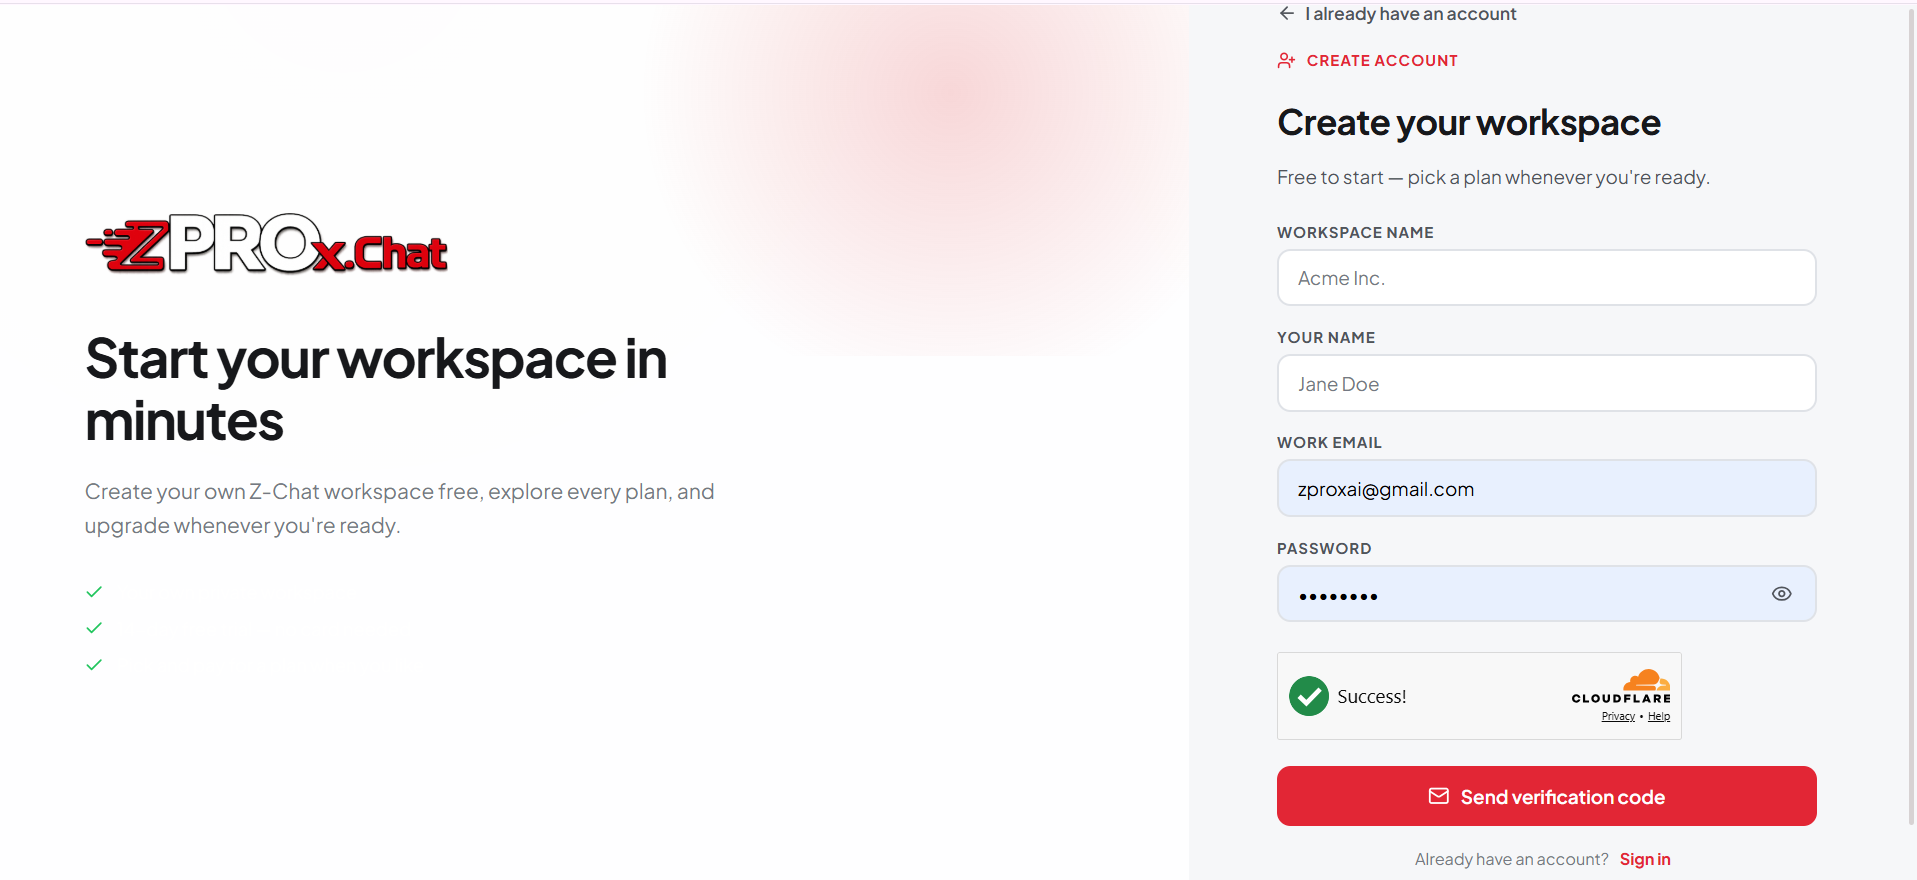 Figure 1. Create your workspace
 -
In the Workspace name box, type your company name, for example
Acme Inc. -
In the Your name box, type your full name.
-
In the Work email box, type your work email address.
-
In the Password box, type a password of at least 8 characters.
Tip: Select the eye icon to show or hide what you typed.
-
If a captcha appears, complete it.
-
Select Send verification code. Zprox.Chat emails a 6-digit code to the address you entered.
-
In the Verification code box, type the 6-digit code.
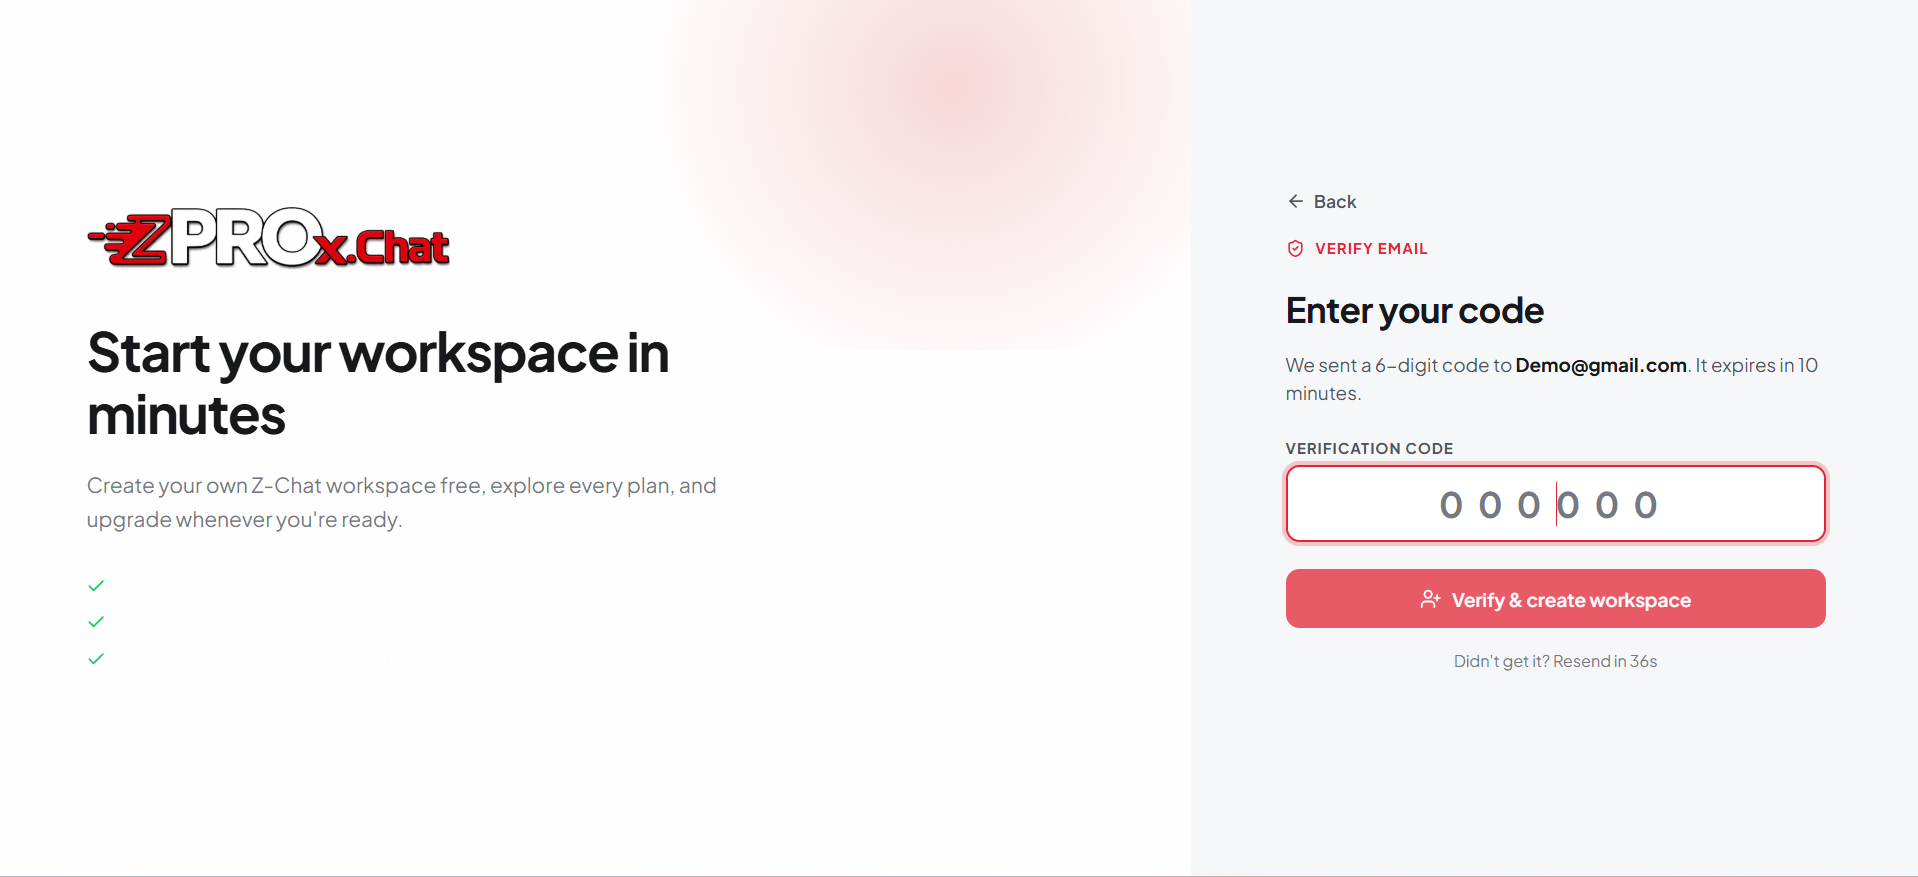 Figure 2. Enter your code
Note: The code expires in 10 minutes. If it doesn't arrive, wait for the countdown to finish and then select Resend code.
-
Select Verify & create workspace. Zprox.Chat creates your workspace, signs you in as the owner, and opens the Plans & Billing page so you can start a trial or choose a plan.
To verify your email address
If your workspace was created for you, Zprox.Chat sends a confirmation link instead of a code. Until you use it, a yellow banner appears at the top of the app.
-
Open the email from Zprox.Chat.
-
Select the confirmation link. The Verify email page opens and confirms the address.
-
Select Continue. The banner disappears the next time the app checks your session.
Note: If you verified in another browser tab, switch back to Zprox.Chat. The banner clears when the tab regains focus.
Important: You can't purchase a plan online until your email address is verified.
To sign in to Zprox.Chat
-
In your browser, go to your Zprox.Chat address.
-
Select Sign in. The Welcome back page appears.
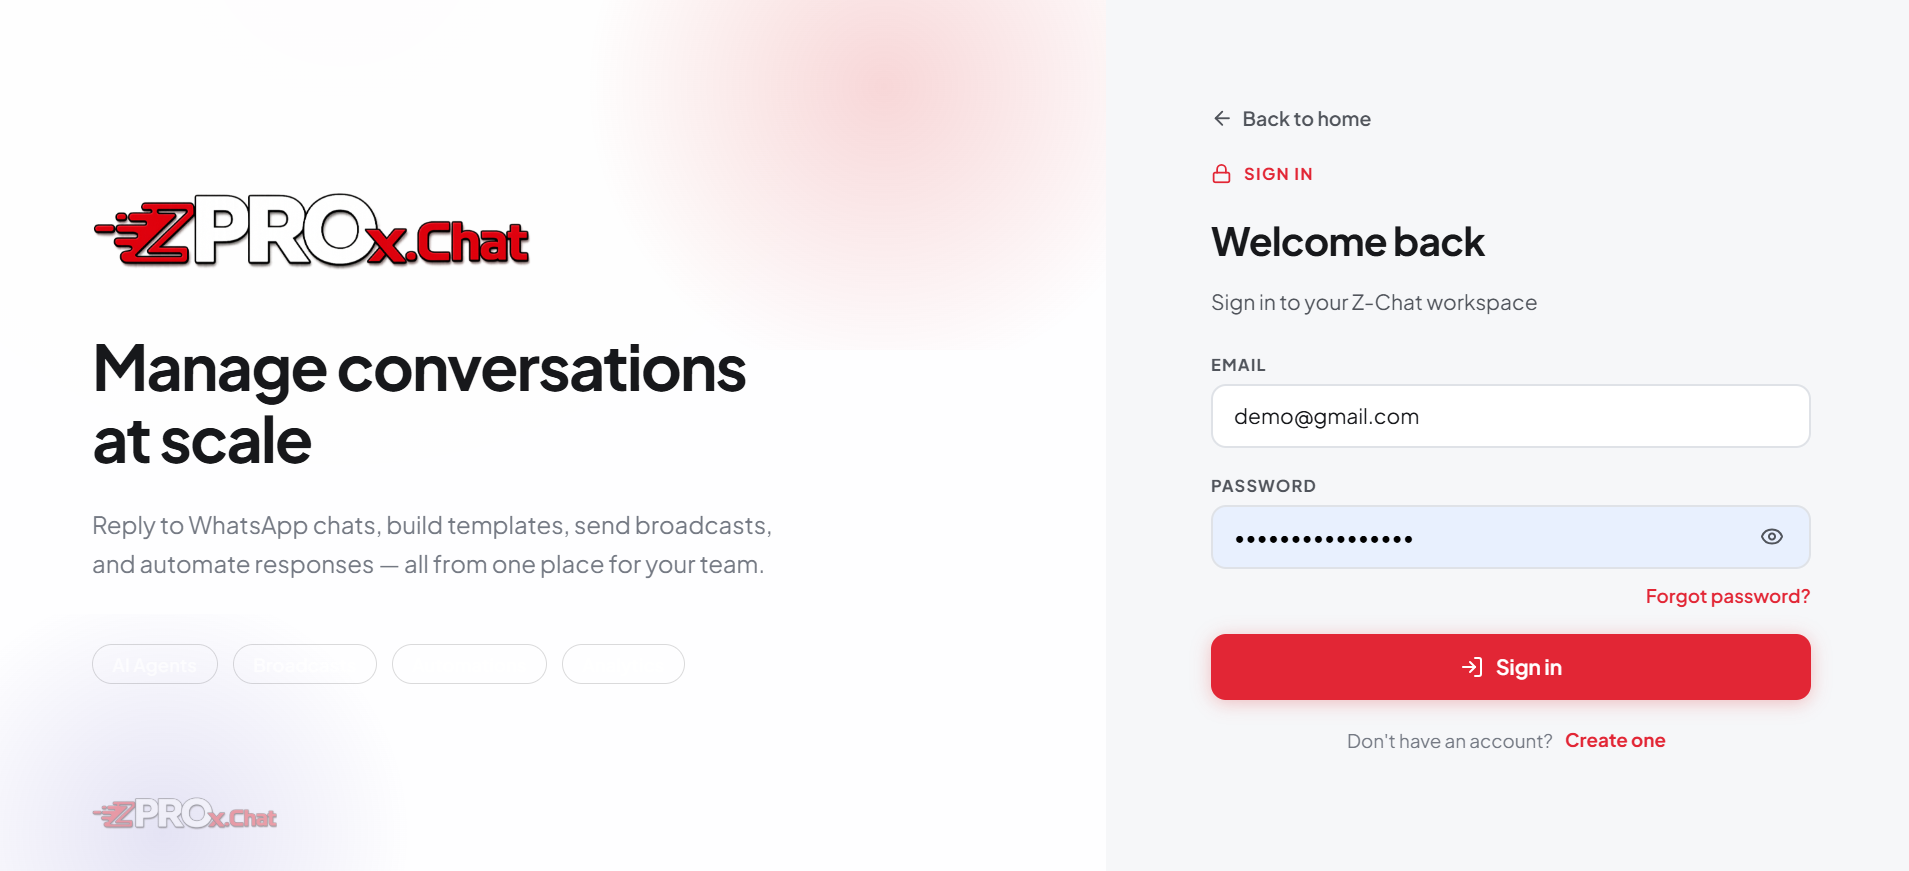 Figure 3. Sign in
 -
In the Email box, type your email address.
-
In the Password box, type your password.
-
If a captcha appears, complete it.
-
Select Sign in. The Home dashboard appears.
Important: After several failed attempts in a row, Zprox.Chat temporarily locks the account. Wait for the lockout to end, or reset your password.
To reset a forgotten password
-
On the sign-in page, select Forgot password?
-
In the Account email box, type your email address.
-
Select the send button. If the address belongs to an account, Zprox.Chat emails a 6-digit code.
Note: For security, Zprox.Chat shows the same confirmation whether or not the address exists.
-
In the Verification code box, type the 6-digit code.
-
In the New password box, type a new password of at least 8 characters.
-
Select the confirm button. Zprox.Chat sets the new password and signs you out of all other sessions.
-
Sign in with the new password.
To complete first-run setup
This procedure applies only to a freshly installed, self-hosted Zprox.Chat instance that has no users yet.
-
Open the Zprox.Chat address. The First-time setup page appears.
-
In the Your name box, type your name. This is optional.
-
In the Email box, type the email address for the owner account.
-
In the Password box, type a password of at least 8 characters.
-
In the Confirm password box, type the same password again.
-
Select Create account & continue. Zprox.Chat creates the owner account and signs you in.
Note: The first user created this way becomes the workspace owner and has the Admin role.
To sign out
- At the bottom of the sidebar, select your name. A menu appears.
- Select Sign out. Zprox.Chat ends the session and returns you to the landing page.
You can also sign out from Settings > General > Account > Sign out.
Tour of the workspace
This section explains the following:
- The sidebar
- The Home dashboard
- To switch between light and dark themes
- To turn desktop notifications on or off
The sidebar
The sidebar on the left is how you move around Zprox.Chat. Items are grouped by what you use them for.
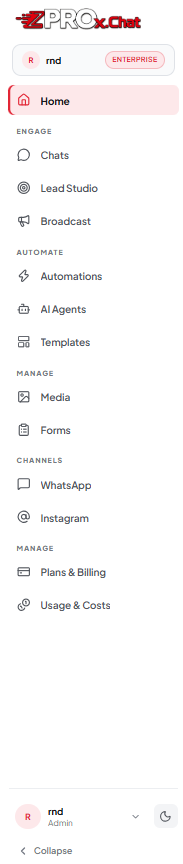 Figure 4. The sidebar
| Group | Item | What it does |
|---|---|---|
| — | Home | The dashboard. See The Home dashboard. |
| Engage | Chats | The shared team inbox. See Chats. |
| Engage | Lead Studio | Your contact database. See Lead Studio. |
| Engage | Broadcast | Bulk template and text sends. See Broadcasts. |
| Automate | Automations | The flow builder. See Automations. |
| Automate | AI Agents | LLM auto-reply agents. See AI agents. |
| Automate | Templates | WhatsApp message templates. See Message templates. |
| Manage | Media | Shared media library. See Media library. |
| Manage | Forms | Lead-capture forms. See Forms. |
| Manage | Plans & Billing | Plans, payment, add-ons. Admin only. See Plans, billing, and usage. |
| Manage | Usage & Costs | Estimated spend. Admin only. See To review usage and costs. |
| Channels | WhatsApp analytics. See The WhatsApp panel. | |
| Channels | Instagram tools. See The Instagram panel. | |
| Apps | Shopify | Appears only when a Shopify store is connected. See Shopify. |
| Apps | WooCommerce | Appears only when a WooCommerce store is connected. See WooCommerce. |
At the top of the sidebar you see your workspace name and your current plan. At the bottom you see your name and role.
To collapse the sidebar: Select Collapse at the bottom. Select the arrow again to expand it.
On a phone or small screen: Select the menu icon in the top-left corner to open the sidebar as a drawer, then select any item to close it again.
Note: If a feature isn't part of your plan, the item stays in the sidebar. Selecting it opens a panel that explains what the feature does and offers an upgrade.
The Home dashboard
Home summarises what happened in your workspace over a chosen period.
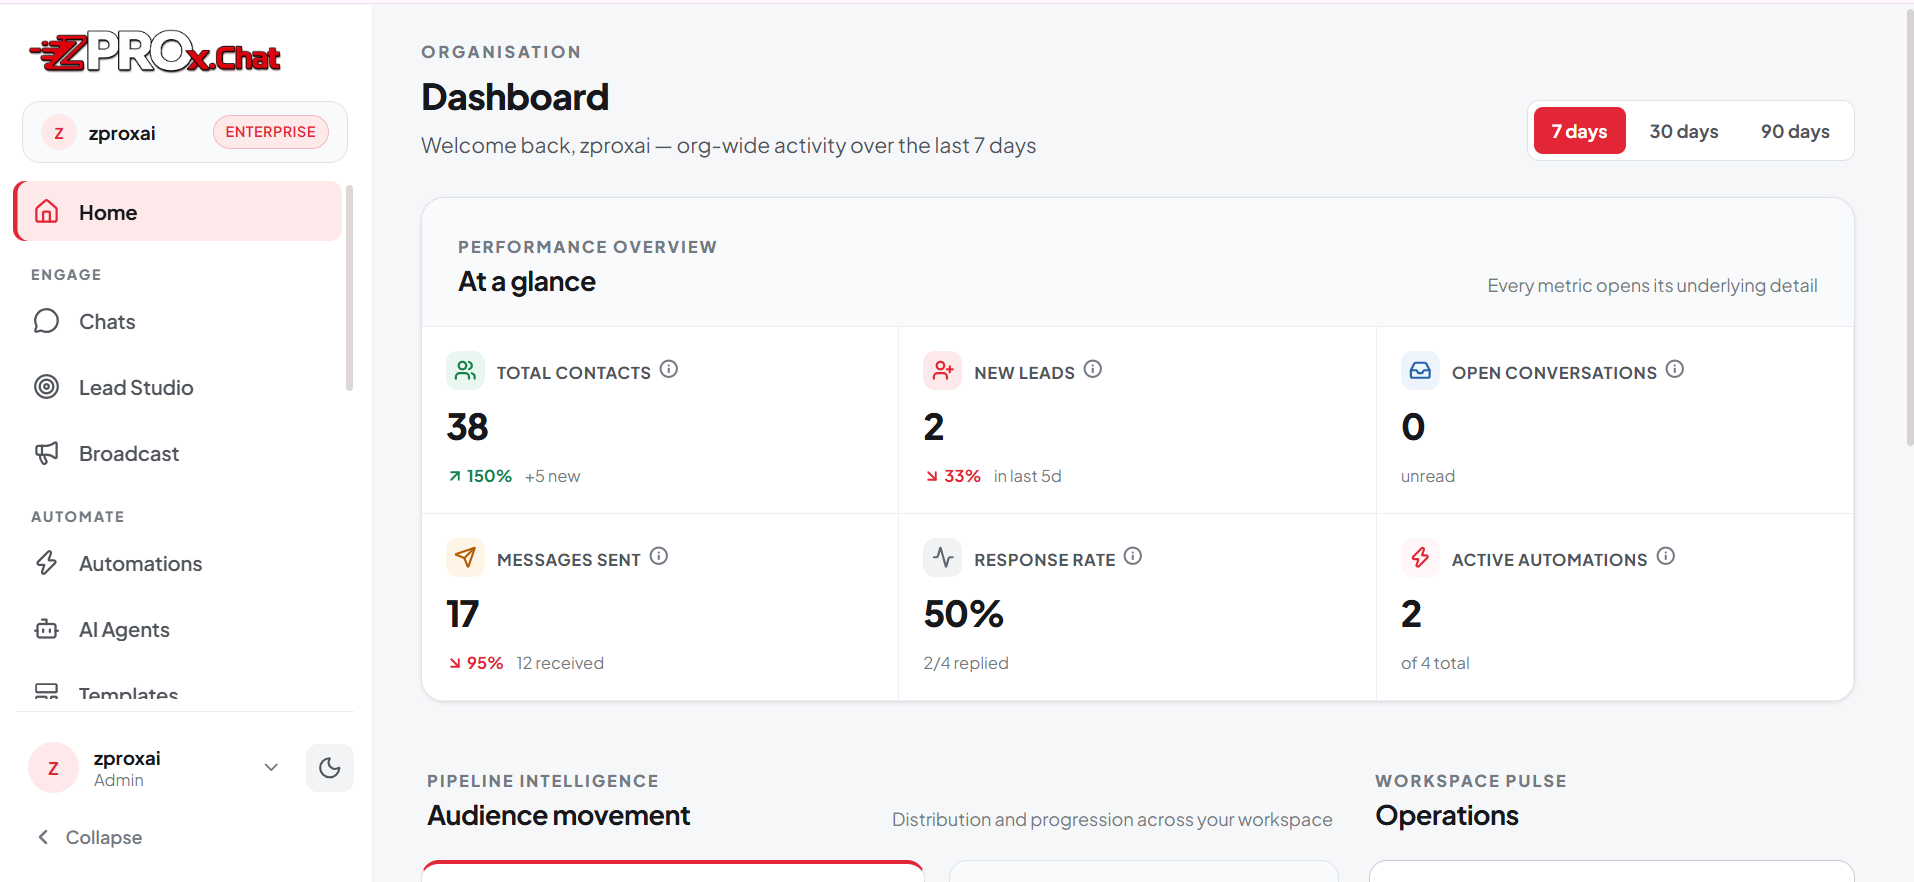 Figure 5. The Home dashboard
-
Select 7 days, 30 days, or 90 days in the top-right corner to change the reporting period.
-
Review the metric strip across the top. It shows total contacts, new leads, open conversations, messages sent, response rate, and automation runs. Each number is a link — select it to see the detail behind it.
-
Review the working area:
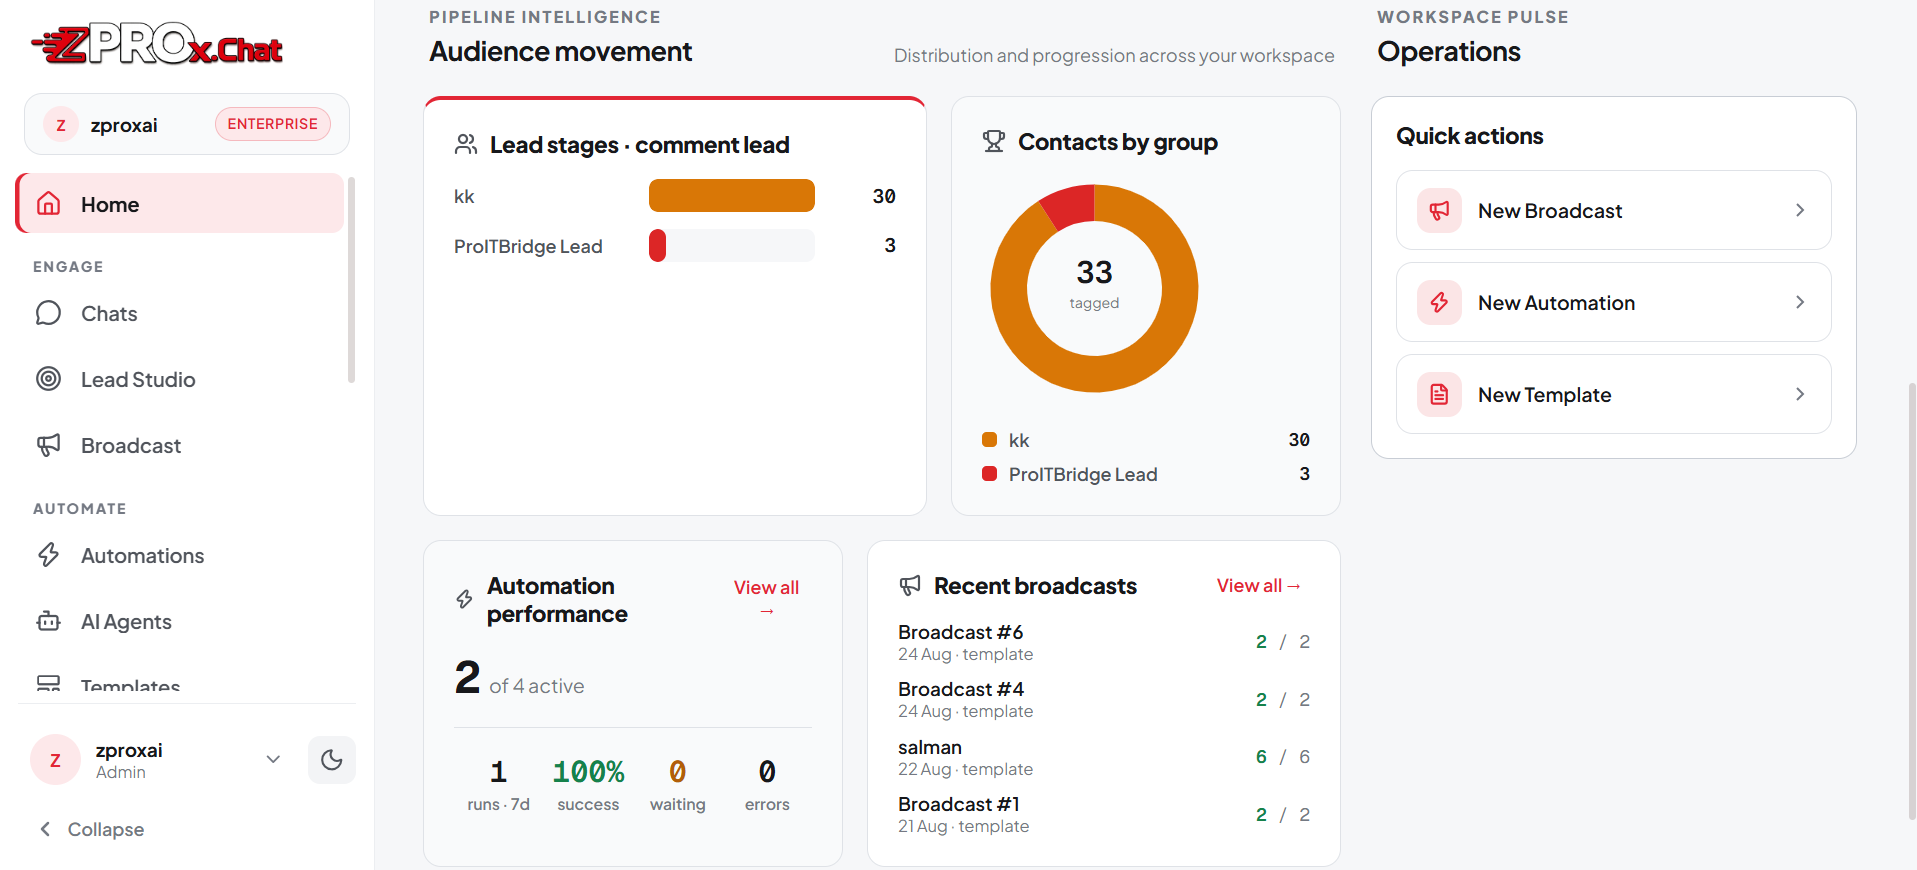 Figure 5.1. The Home dashboard working area
Card What it shows Lead funnel How many contacts sit in each lifecycle stage. Contacts by group A donut of how your tagged contacts are distributed. Automation performance Runs, success rate, waiting runs, and errors. Recent broadcasts Your latest campaigns and their results. Quick actions Shortcuts. Admins see New Broadcast, New Automation, and New Template. Sales users see Open Chats and Contacts. Needs attention Warnings such as failed sends or expiring tokens. Open tasks Tasks created by a human-handoff step. Select the circle to mark a task done.
Note: The dashboard refreshes by itself about once a minute.
To switch between light and dark themes
- At the bottom of the sidebar, select the sun or moon icon.
- The theme changes at once and is remembered on this device.
To turn desktop notifications on or off
- At the bottom of the sidebar, select your name. A menu appears.
- Set the notification toggles:
- Turn on the desktop-notification toggle to get a browser notification when a new message arrives. Your browser asks for permission the first time.
- Turn on the mute toggle to silence notifications without turning them off.
- Select anywhere outside the menu to close it.
Note: Notification settings are per user and per browser. If you sign in on another computer, set them again there.
Set up your workspace
Do these tasks once, before you start messaging. Most of them are Admin only.
This section explains the following:
- To set your timezone
- To set up the 24-hour window reminder
- To create categories and groups
- To create lifecycle stages
- To create custom contact fields
- To add and manage users
- To delete your account
To open Settings: At the bottom of the sidebar, select your name, then select Settings. The settings pages appear with their own navigation list.
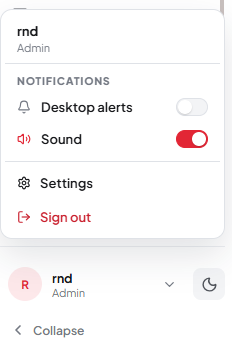 Figure 6. The user menu
To set your timezone
Your timezone controls how times appear in reports, and when scheduled automations run.
- Go to Settings > General.
- Under Timezone, select the box. A searchable list appears.
- Type part of a city or region name to filter the list, for example
Kolkata. - Select your timezone. Zprox.Chat saves the change.
To set up the 24-hour window reminder
WhatsApp lets you send a normal message only within 24 hours of the customer's last message. This setting defines the nudge Zprox.Chat sends before that window closes, so a conversation stays open.
-
Go to Settings > General.
-
Find the 24-hour window reminder card.
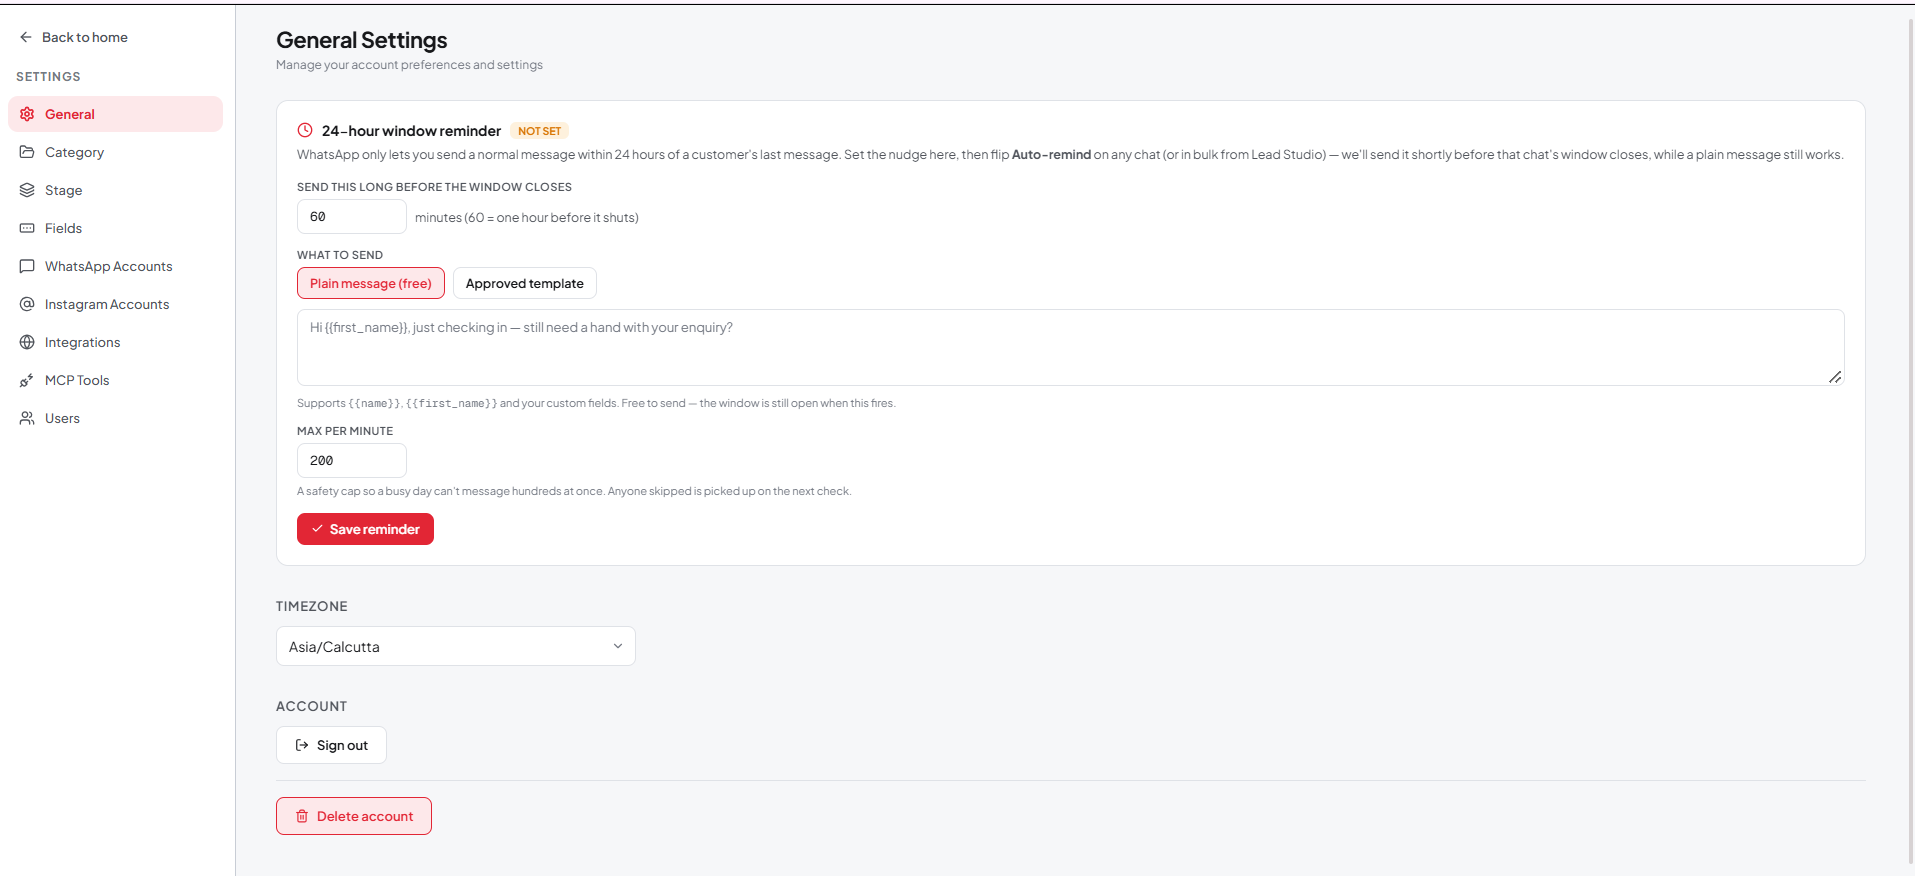 Figure 7. 24-hour window reminder
 -
In Send this long before the window closes, set how early the reminder goes out.
-
Under What to send, choose the message type:
- Text — type the message to send.
- Template — select an approved template from the list.
-
Select Save. The Auto-remind toggle becomes available in every chat.
To use the reminder on a conversation: Open the chat and turn on Auto-remind, or turn it on for many leads at once from Lead Studio. See To run bulk actions.
To create categories and groups
A category is a label type, such as Interest or City. A group is a value inside that category, such as Pricing or Chennai. A contact can hold only one group per category, which keeps your segments clean.
To create a category:
- Go to Settings > Category.
- Select Add category.
- Type a Name, for example
Interest. - Type a Description. This is optional.
- Select Save.
To add groups to a category:
- On the Categories page, select the category. The category detail page appears.
- Select Add group.
- Type the group name, for example
Pricing. - Choose a colour. The colour is what you see on badges in Chats and Lead Studio.
- Select Save.
To delete a group: Open the category, select Delete on the group row, and confirm.
Important: Deleting a group removes it from every contact that carries it. This can't be undone.
To create lifecycle stages
Stages describe where a lead sits in your sales process, such as New, Qualified, Won.
- Go to Settings > Stage.
- In the box at the top, type the stage name.
- Select Add. The stage appears in the list with a colour.
- To change a colour, select the colour swatch on the stage row and pick a new one.
- To rename a stage, select its name, edit the text, and press Enter.
- To reorder stages, drag a row up or down. The order you set here is the order shown in the Home funnel and in Lead Studio.
- To delete a stage, select Delete on the row and confirm.
To create custom contact fields
Custom fields capture details that aren't built in, such as Company size or Renewal date. They appear when you edit a contact, and you can map form answers and imported columns to them.
-
Go to Settings > Fields.
-
Select Add field.
-
Type a Field name.
-
Select a Type:
Type Use it for Text Short single-line values. Text area Longer notes. Number Numeric values. Phone Phone numbers. Email Email addresses. Date Calendar dates. URL Web addresses. -
Type a Description. This is optional and helps your team know what to enter.
-
Select Save.
To edit or delete a field: On the Fields page, select Edit or Delete on the field row.
To add and manage users
Admin only.
-
Go to Settings > Users.
-
Select Add user.
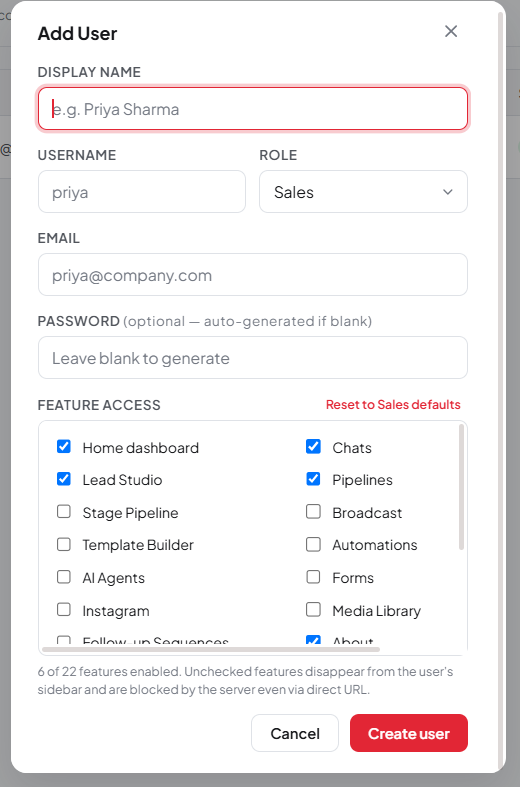 Figure 8. Add user
 -
Fill in the user's display name, username, email address, and a starting password.
-
Select a Role:
Role What the user can do Admin Everything, including settings, users, plans, and integrations. Sales Works only the chats and contacts assigned to them. Viewer Read-only access. -
For a Sales or Viewer user, select the pages they may open, such as Chats, Lead Studio, or Broadcast. Clear a page to hide it from them.
-
Select Save. The user appears in the list.
Other actions on the Users page:
- To disable a user: Select their Active badge. They lose access immediately but their record is kept.
- To edit a user: Select Edit on their row.
- To reset a password: Select Reset password on their row.
- To delete a user: Select Delete on their row and confirm. Contacts assigned to them stay in the workspace but become unassigned in their view.
Note: You can't disable or delete your own account from this page.
To delete your account
Important: This permanently removes your account. It can't be undone.
- Go to Settings > General.
- Under Account, select Delete account.
- In the box that appears, type
delete. - Select Delete account again to confirm.