Channels
Connect your WhatsApp Business account
You must connect at least one WhatsApp Business account before you can send templates, run broadcasts, or use automations on WhatsApp.
This section explains the following:
- To connect with Login with Facebook
- To connect manually with Cloud API credentials
- To check account health
- To update a token or delete an account
To open the page: Go to Settings > WhatsApp Accounts.
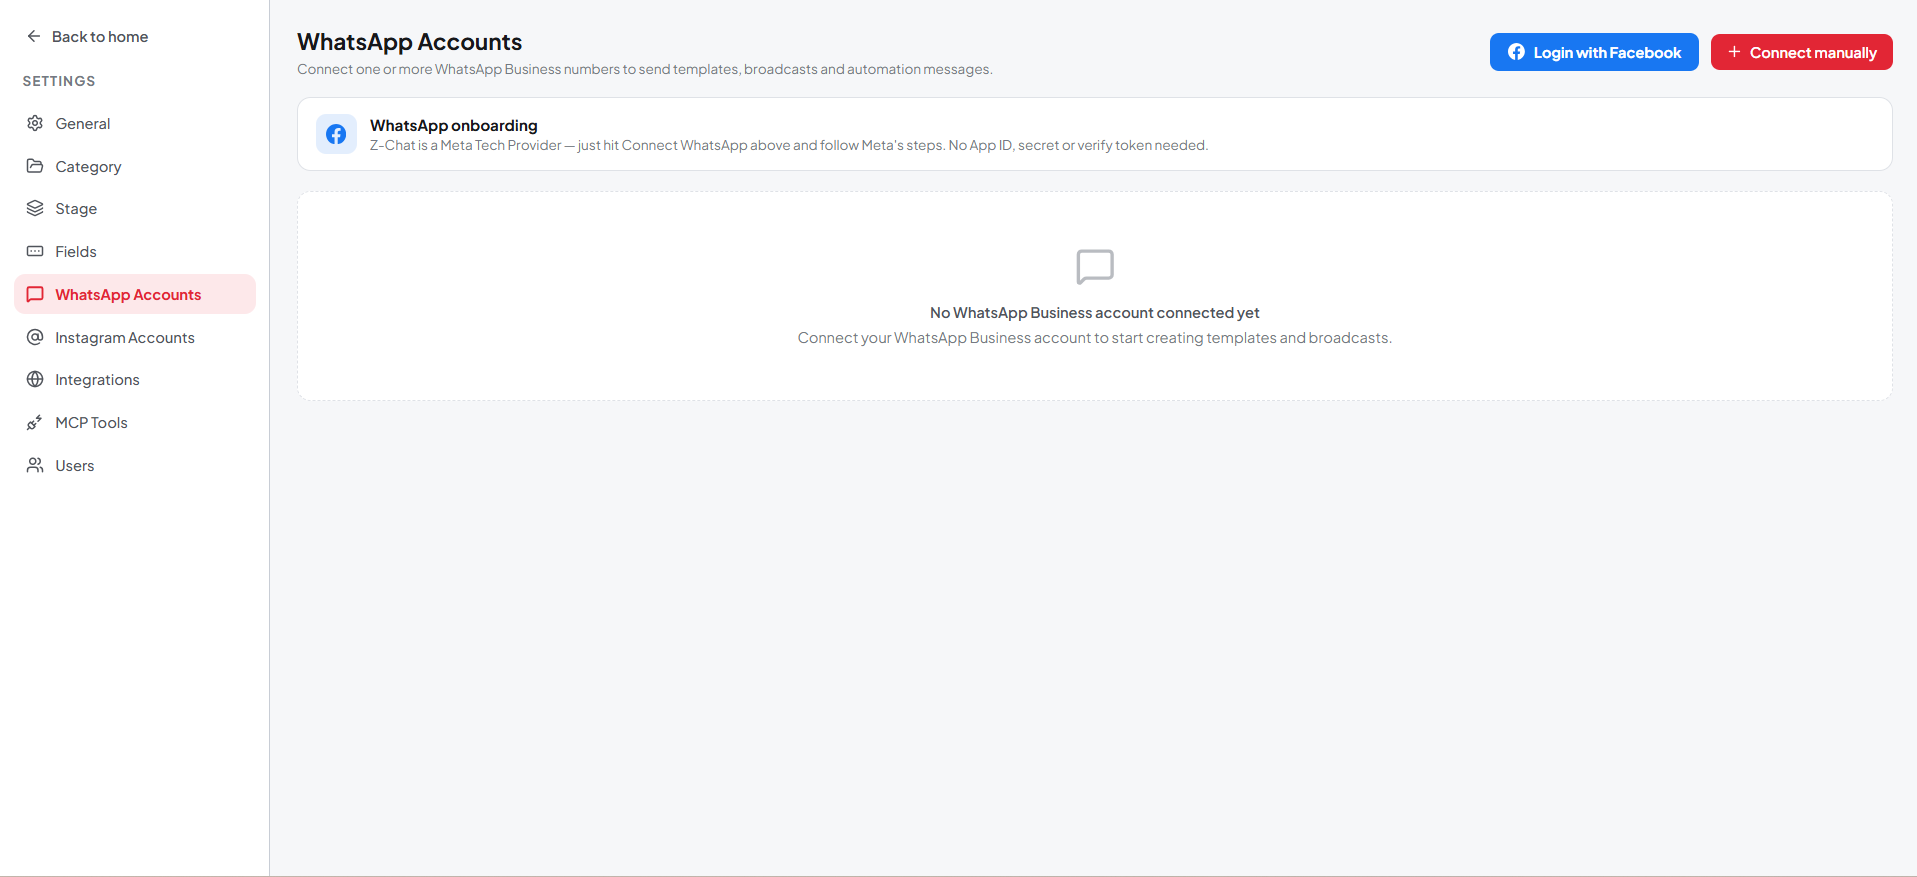 Figure 9. WhatsApp Accounts
To connect with Login with Facebook
This is the recommended method. Zprox.Chat is a Meta Tech Provider, so it fetches your phone number and WhatsApp Business Account ID for you. You don't need an App ID, an app secret, or a verify token.
- Go to Settings > WhatsApp Accounts.
- Select Login with Facebook. A Meta window opens.
- Sign in with the Facebook account that manages your business.
- Follow Meta's steps to choose or create your Meta Business account and your WhatsApp Business Account.
- Choose the phone number to use, and complete Meta's verification if the number isn't verified yet.
- Return to Zprox.Chat. A green confirmation appears and the number is listed in the table.
Note: If you don't see the Login with Facebook button, WhatsApp onboarding isn't switched on for your workspace. Contact support.
To connect manually with Cloud API credentials
Use this method if you already run your own Meta app and want to supply your own credentials.
-
Go to Settings > WhatsApp Accounts.
-
Select Connect manually. The Add WhatsApp Business account dialog appears.
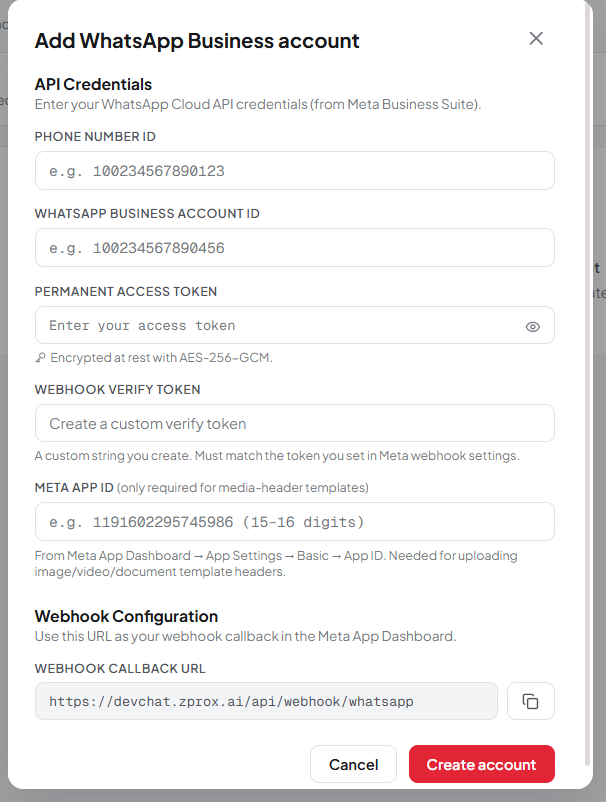 Figure 10. Add WhatsApp Business account
 -
Under API Credentials, fill in the boxes. You find these values in Meta Business Suite and the Meta App Dashboard.
Box Where to find it Phone Number ID Meta App Dashboard > WhatsApp > API Setup. WhatsApp Business Account ID Meta App Dashboard > WhatsApp > API Setup. Permanent Access Token A System User token from Meta Business Suite. Zprox.Chat encrypts it at rest with AES-256-GCM. Webhook Verify Token A custom string you invent. You must enter exactly the same string in Meta. Meta App ID Meta App Dashboard > App Settings > Basic > App ID. Required only for templates with image, video, or document headers. -
Under Webhook Configuration, select the copy icon next to Webhook Callback URL.
-
In the Meta App Dashboard, go to WhatsApp > Configuration, paste the callback URL, paste the same verify token, and subscribe to the message fields.
-
Back in Zprox.Chat, select Create account. The number appears in the table.
Important: Messages only reach Zprox.Chat after the webhook is verified in Meta. If inbound messages don't arrive, check that the callback URL and verify token match exactly.
To check account health
The Health column tells you whether Zprox.Chat can still talk to Meta with the stored token.
| Badge | Meaning | What to do |
|---|---|---|
| Healthy | The connection works. | Nothing. |
| Token expired | The access token is no longer valid. | Edit the account and paste a new permanent token. |
| Rate limited | Meta is throttling your sends. | Wait, then reduce send volume. |
| Error | Meta returned an error. | Point at the badge to read the message. |
| Not checked | Zprox.Chat hasn't tested the account yet. | Send a message, or wait for the next check. |
The Status column shows whether the number is Active or Inactive in Zprox.Chat.
To update a token or delete an account
- Go to Settings > WhatsApp Accounts.
- On the account row, select the eye icon to edit it.
- Change the values you need. Leave Permanent Access Token blank to keep the existing token.
- Select Save changes.
To delete an account: Select the bin icon on the row and confirm.
Important: Deleting an account stops all sending and receiving on that number. Conversations already in your inbox are kept.
Connect your Instagram account
Connect an Instagram Business account to receive and reply to Instagram direct messages inside Chats, to automate comments, and to let an AI agent answer DMs. Each account connects directly through Instagram — you don't need a Facebook Page.
This section explains the following:
To connect an Instagram Business account
-
Go to Settings > Instagram Accounts.
-
Select Connect Instagram. An Instagram authorisation window opens.
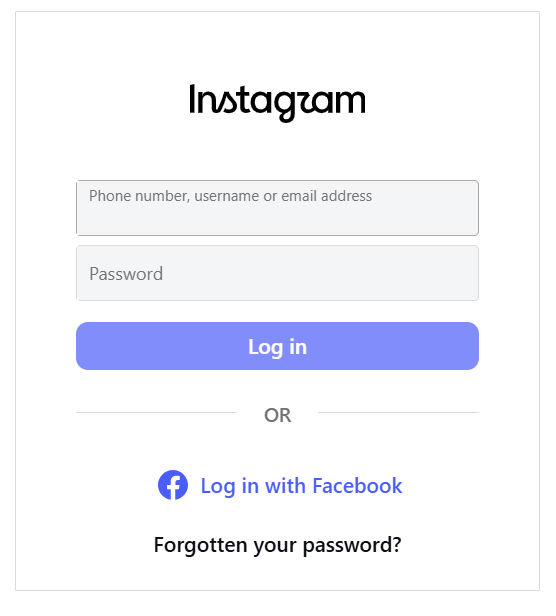 Figure 11. Instagram sign-in window
 -
Sign in with the Instagram Business account you want to connect.
-
Review the permissions and select Allow.
-
Return to Zprox.Chat. The account appears in the list with its profile picture and handle.
Note: If you don't see the Connect Instagram button, either Instagram isn't included in your plan or Instagram connections aren't switched on for your workspace. Contact support.
After connecting, a new Instagram item appears under Channels in the sidebar, and Instagram conversations appear in Chats alongside WhatsApp.
To disconnect an Instagram account
- Go to Settings > Instagram Accounts.
- On the account row, select Disconnect.
- Read the warning and confirm.
Important: Disconnecting stops DM syncing and stops every automation and AI agent bound to that account. Existing conversations stay in your inbox.
The WhatsApp panel
The WhatsApp panel under Channels shows how your WhatsApp channel is performing. Connecting a number stays in Settings > WhatsApp Accounts.
-
Select WhatsApp in the sidebar.
-
Select 7 days, 30 days, or 90 days to change the period.
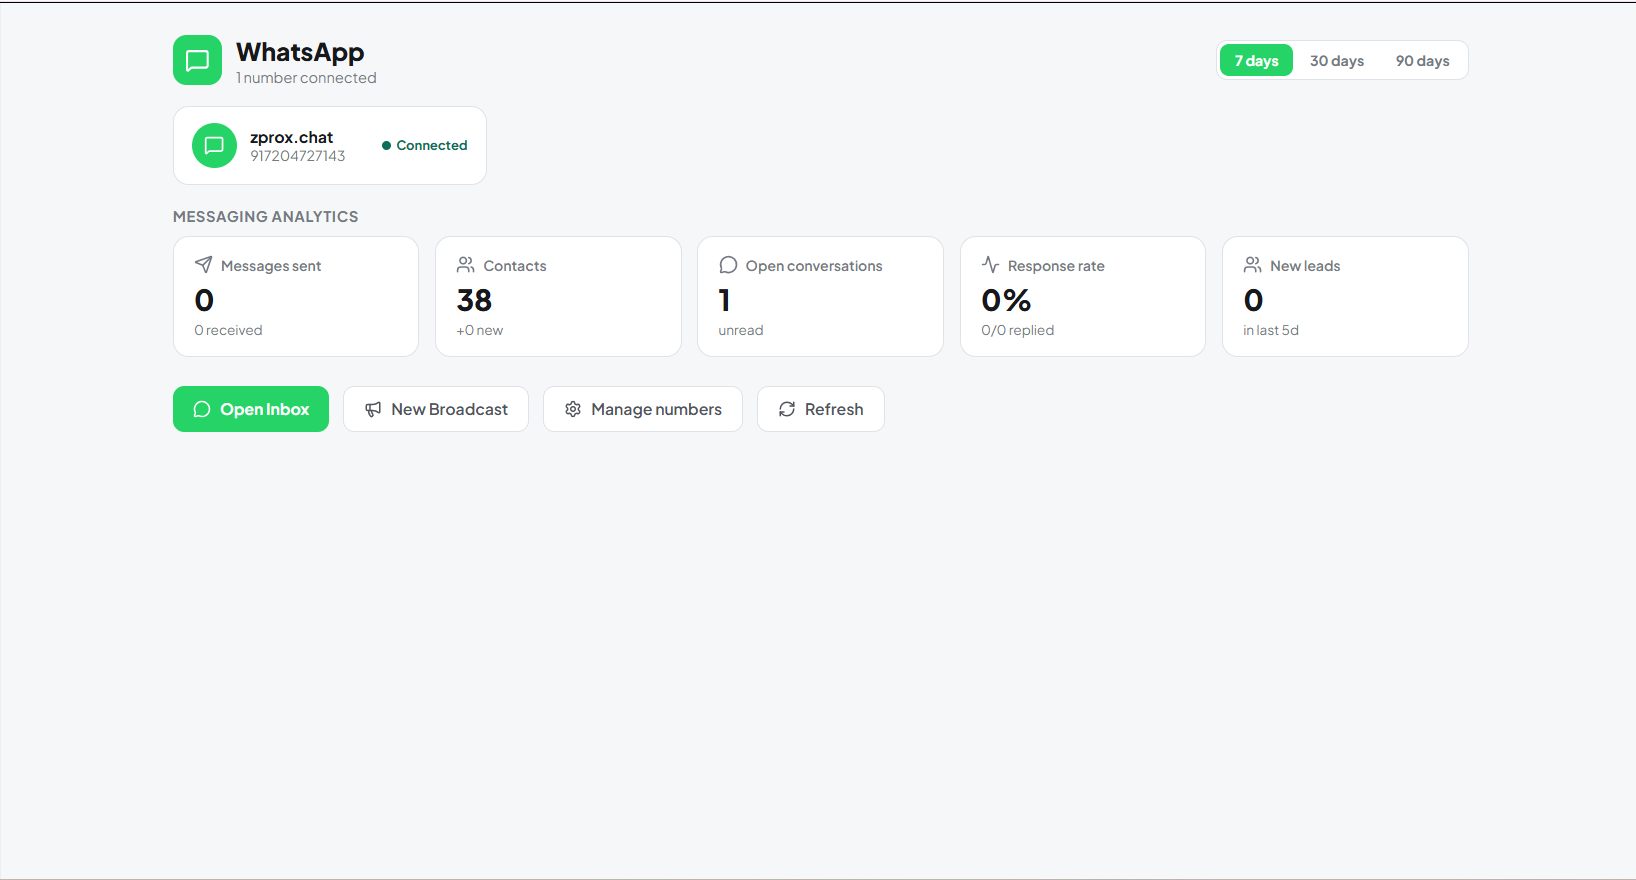 Figure 25. The WhatsApp panel
 -
Review the cards:
Card What it shows Messages sent Messages your workspace sent in the period. Contacts Total WhatsApp contacts. Select it to open Lead Studio. Open conversations Conversations awaiting a reply. Select it to open Chats. Response rate How often your team replied. New leads Contacts who messaged you for the first time in the period.
The Instagram panel
The Instagram panel appears under Channels once you connect an Instagram Business account.
This section explains the following:
- Account overview
- To open Performance
- To set conversation starters
- To build the main menu
- To set up comment-to-DM automations
- To manage comments
Account overview
Select Instagram in the sidebar. The overview shows your profile picture, handle, and connection state, with five figures:
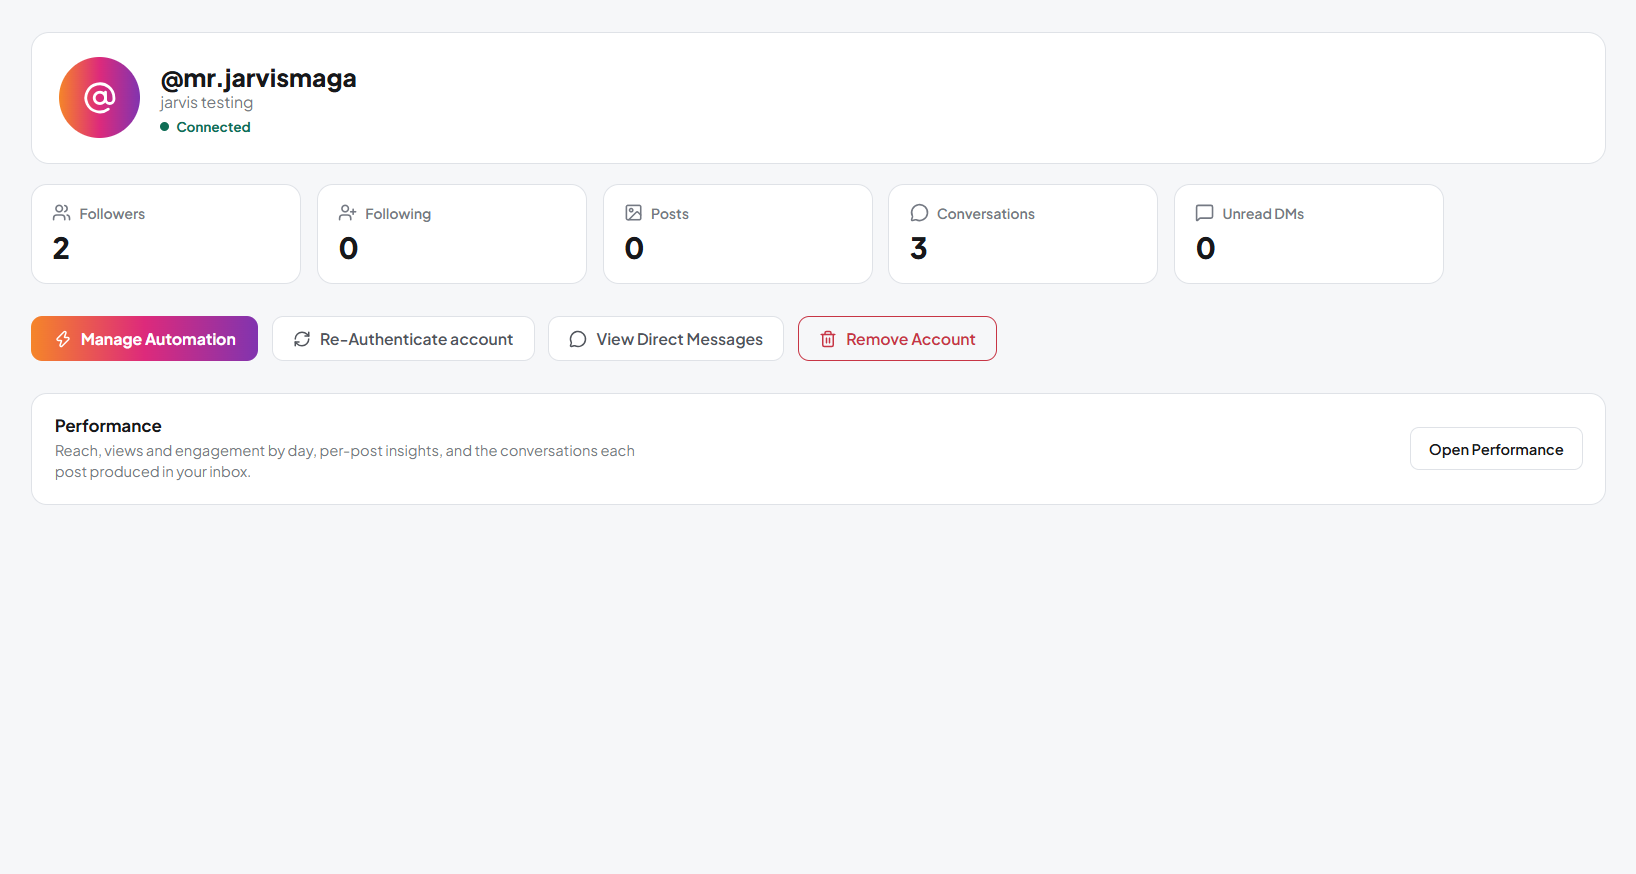 Figure 26. The Instagram panel
| Figure | Source |
|---|---|
| Followers | Live from Instagram. |
| Following | Live from Instagram. |
| Posts | Live from Instagram. |
| Conversations | Your workspace inbox. Select it to open Chats. |
| Unread DMs | Your workspace inbox. Select it to open Chats. |
The buttons below are:
- Manage Automation — opens the automation tools described in the rest of this section.
- Re-Authenticate account — refreshes Instagram permissions. Use this if DMs stop arriving.
- View Direct Messages — opens the Instagram inbox in Chats.
- Remove Account — disconnects the account. See To disconnect an Instagram account.
To open Performance
- On the overview, select Open Performance.
- Review reach, views, and engagement by day, per-post insights, and the conversations each post produced in your inbox.
- Select Back to account to return.
To set conversation starters
Conversation starters are suggested questions Instagram shows when someone opens your DM for the first time.
- Select Manage Automation, then select Conversation Starters.
- Select Add starter and type the question, for example
What are your delivery times? - Add more starters, and set a version per language if you need to.
- Select Save.
To remove all starters: Select the remove option and confirm.
To build the main menu
The main menu is a persistent set of 1–3 buttons always available in the DM composer.
-
Select Manage Automation, then select Main Menu.
-
Under Default, select Add menu item.
-
Type the button label.
-
Choose the item type:
Type What it does Trigger action Sends a payload keyword back to you, which can fire an automation. Open Link Opens a URL. -
Fill in the payload keyword or the URL.
-
To add a menu for another language, add a language group and repeat.
-
Check the preview on the right, then select Save.
Important: You must have at least one item under Default — Instagram uses it as the fallback for every language.
To remove the menu: Select the remove option and confirm. The menu is cleared on Instagram.
To set up comment-to-DM automations
- Select Manage Automation, then select Comment to DM / Automations.
- Select New automation.
- Choose which posts or reels the rule applies to.
- Set the keyword or condition the comment must match.
- Set what happens: a public reply on the comment, a DM to the person who commented, or both. Type the message for each.
- Save and turn the rule on.
Note: Automations answer before an AI agent does. Anything an automation doesn't match can fall through to the agent. See To let the agent answer Instagram comments.
To manage comments
- Select Manage Automation, then select Comments.
- Review comments as they arrive.
- On any comment, choose to reply, hide it, or delete it.
- To stop new comments on a post, turn commenting off for that post.
Shopify
Connect a Shopify store to send order notifications, recover abandoned carts, and confirm cash-on-delivery orders over WhatsApp.
This section explains the following:
- To connect a Shopify store
- Dashboard and Orders
- To set up order notifications
- To set up abandoned-cart recovery
- To set up the COD flow
- To verify and reconcile the connection
- To disconnect a Shopify store
To connect a Shopify store
-
Go to Settings > Integrations.
-
Select the Shopify card.
-
In the store box, type your permanent
.myshopify.comdomain, for exampleyour-store.myshopify.com.Note: Find this in your Shopify admin under store settings. Don't use a custom domain.
-
Select Connect store. Shopify opens and asks you to approve the app.
-
Approve the permissions. You return to Zprox.Chat and the store shows as Connected.
A Shopify item appears under Apps in the sidebar.
Dashboard and Orders
Select Shopify in the sidebar. The connection card at the top names the store, its status, and how many webhooks are active. Below it are five tabs.
| Tab | What it shows |
|---|---|
| Dashboard | Store and messaging figures for the period. |
| Orders | A worklist of orders, with filters and message history per order. |
| Abandoned cart | Carts that were never completed, and the recovery ladder. |
| COD flow | Cash-on-delivery confirmation requests and their outcomes. |
| Messages | Notification settings, the sending number, admin alerts, and delivery logs. |
Tip: Each tab has its own address, so you can share a link that opens the exact tab.
To set up order notifications
-
Select Shopify > Messages.
-
Under WhatsApp sender, choose the number that sends this store's notifications.
-
Under Order notifications, open the event you want to configure:
Event Fires when Order received Shopify records a new order. Order fulfilled An order is fulfilled without tracking details. Order shipped A fulfilment carries a tracking number. Shipment updated The carrier reports a tracking change. Order cancelled An order is cancelled in Shopify. Refund processed Shopify creates a refund. New order · admin alert Sent to every admin recipient you list. -
Select an Approved template.
-
Under Template variables, map every placeholder to an order value.
Important: An unmapped variable stops the notification from sending.
-
Turn on Enable this notification.
-
Under Admin alerts, add the numbers that should receive the internal new-order alert.
To check what was sent: Scroll to the delivery log. Each message shows a status of queued, sent, delivered, read, failed, or skipped.
To set up abandoned-cart recovery
- Select Shopify > Abandoned cart.
- Under Automated recovery, turn the feature on.
- Under When does a cart count as abandoned?, set:
- Which checkouts count
- Quiet for — how long after the shopper's last activity a cart counts as abandoned
- Under Who gets a reminder?, set:
- Minimum cart value —
0includes every cart - Marketing consent — turn on Only opted-in shoppers to respect consent
- Minimum cart value —
- Under When do we stay quiet?, set the quiet hours and the store timezone. Leave both hours blank to send at any time.
- Set the Attribution window (hours) — a purchase within this time after a reminder counts as recovered.
- Under Reminders, add up to five steps. For each step:
- Set how long after the previous step it sends.
- Select an approved Template and map its variables.
- Optionally add a Discount code. Create the code in Shopify first, paste it here, then map a variable to the discount code or to the checkout link with the discount applied.
- Use the arrows to reorder steps, and the switch to enable or disable one.
- Select Save.
Important: A cart with no reachable phone number or no checkout link is never messaged, whatever these settings say. Each reminder goes out at most once per cart.
To set up the COD flow
The COD flow asks the customer over WhatsApp whether to ship a cash-on-delivery order, then acts on the Shopify order based on their answer.
- Select Shopify > COD flow.
- Turn the flow on.
- Select which order statuses trigger it.
- Select the Confirmation template. It must carry Confirm and Cancel quick-reply buttons.
- Map the template's variables.
- Set Send after (hours) — the delay before the first message.
0sends immediately. - Set No-reply deadline (hours) — reminders stop and the no-reply action fires after this.
- Choose what happens for each outcome:
- If the customer says YES
- If the customer says NO
- If there is no reply by the deadline
- For cancellations, choose whether to:
- Put the items back into inventory
- Send Shopify's cancellation email
- Under the button mapping, tell Zprox.Chat which button means YES (Confirm) and which means NO (Cancel).
- Set what to send after the customer confirms.
- Select Save.
To review outcomes: On the same tab, use the Verifications list. Filter by order, name, phone number, or minimum amount. Select a verification to open its timeline, its messages, and the customer's other COD orders.
To verify and reconcile the connection
- Re-verify — runs the connection checks and reports what came back, including how many webhooks are active and any missing permissions.
- Reconcile webhooks — re-registers every webhook Zprox.Chat needs. Use this if events stop arriving.
If either action reports missing permissions, reconnect the store to grant them.
To disconnect a Shopify store
- On the Shopify page, select the disconnect action.
- Read the warning and select Disconnect store.
Note: Event processing stops. Your existing orders, carts, COD verifications, and message history are kept.
WooCommerce
WooCommerce connects with API keys — there's no app to install and no OAuth. You can connect more than one store.
This section explains the following:
- To connect a WooCommerce store
- Overview and Orders
- To set up order notifications
- To set up the recovery ladder
- To set up the COD flow
- To create and send coupons
- To add or remove a store
To connect a WooCommerce store
First, create API keys in WooCommerce:
- In your store, go to WooCommerce > Settings > Advanced > REST API.
- Select Add key, type a description, and pick a user.
- Set Permissions to Read/Write, then select Generate API key.
- Copy the consumer key (
ck_…) and the consumer secret (cs_…). They're shown only once.
Important: Your store must be reachable over HTTPS, and its permalinks must not be set to Plain.
Then connect the store in Zprox.Chat:
- Go to Settings > Integrations and select the WooCommerce card.
- Select Connect a WooCommerce store.
- Fill in:
- Store URL — for example
https://yourstore.com - Store label — a friendly name for the store switcher. This is optional.
- Consumer key — the
ck_…value - Consumer secret — the
cs_…value
- Store URL — for example
- If your store sits behind HTTP basic authentication, expand the advanced options and fill in the tunnel username and password.
- Select Connect store. Zprox.Chat tests the keys and lists the store.
A WooCommerce item appears under Apps in the sidebar.
Overview and Orders
Select WooCommerce in the sidebar. If you connected more than one store, use the store switcher at the top.
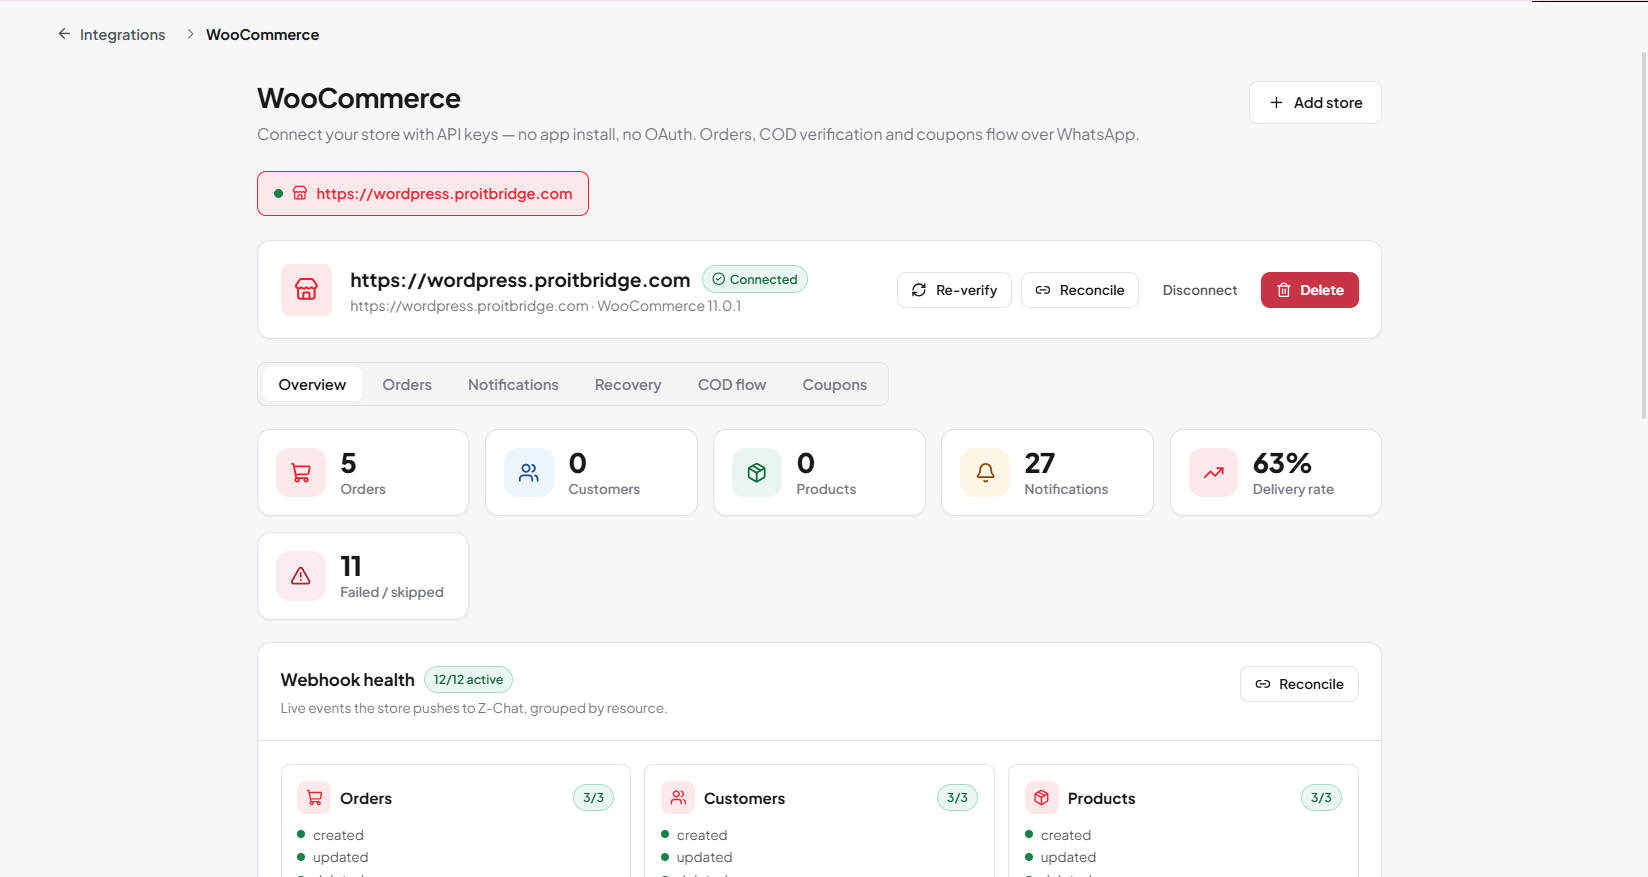 Figure 28. WooCommerce store overview
| Tab | What it shows |
|---|---|
| Overview | Orders, customers, products, notifications sent, delivery rate, failed or skipped messages, webhook health, and recent activity. |
| Orders | Your store's orders, with detail and message history. |
| Notifications | Templates per order event, the sending number, admin alerts, tracking keys, and delivery logs. |
| Recovery | The abandoned-checkout ladder and its results. |
| COD flow | Cash-on-delivery confirmation and write-back to the order. |
| Coupons | Create a coupon and send it over WhatsApp. |
To set up order notifications
- Select WooCommerce > Notifications.
- Under WhatsApp sender, choose the number that sends store notifications.
- Under Order notifications, pick an approved template for each order moment and map its variables.
- Under Admin alerts, add the numbers that receive the internal new-order alert.
- Under Tracking & review link, map the order-meta keys that hold tracking information so that the shipped message can include them:
- Tracking number key, for example
_tracking_number - Tracking URL key, for example
_tracking_url - Carrier key, for example
_tracking_provider - Review / feedback link — used by the
{{reviewLink}}variable in the review-request template
- Tracking number key, for example
- Under Status update notifications, add a rule for any order status — shipped, out for delivery, delivered, or a custom status from your shipping plugin. Tracking variables are available here too.
- Select Save.
To check what was sent: Open Delivery logs on the same tab.
To set up the recovery ladder
- Select WooCommerce > Recovery.
- Under Abandoned-checkout recovery, turn the feature on. Orders that reached checkout but were never paid enter a timed ladder.
- Set:
- Minimum cart value — only recover orders at or above this total
- Recover orders from the last (hours)
- Quiet hours (skip sends) — a from hour and a to hour
- Under Recovery ladder, select Add step for each reminder, up to five. For each step:
- Set Send after (hours)
- Select an approved Template
- Optionally select a Coupon from your store. Its code fills the
{{recoveryCoupon}}variable.
- Select Save.
The KPI cards at the top show carts targeted, messages sent, and recovered orders.
To set up the COD flow
- Select WooCommerce > COD flow.
- Turn the flow on.
- Select the confirmation template and map its variables.
- Set the delay before the first message and the no-reply deadline.
- Choose the action to take on the WooCommerce order for confirm, decline, and no reply.
- Select Save.
Note: Zprox.Chat writes the outcome back to the real order in WooCommerce.
To create and send coupons
- Select WooCommerce > Coupons.
- Select Create & send a coupon.
- Set the discount type, the amount, and any restrictions.
- Choose the recipient and the template that carries the code.
- Select Send. Zprox.Chat creates the coupon in WooCommerce and sends it over WhatsApp.
To add or remove a store
- To add another store: Go to Settings > Integrations > WooCommerce and select Add store.
- To remove a store: Open the store's connection settings and select the disconnect action.
Note: The Connection settings link on the WooCommerce page takes you straight to Settings > Integrations.
Integrations
Integrations connect the outside services your AI agents and automations use. Go to Settings > Integrations and select a card to manage it.
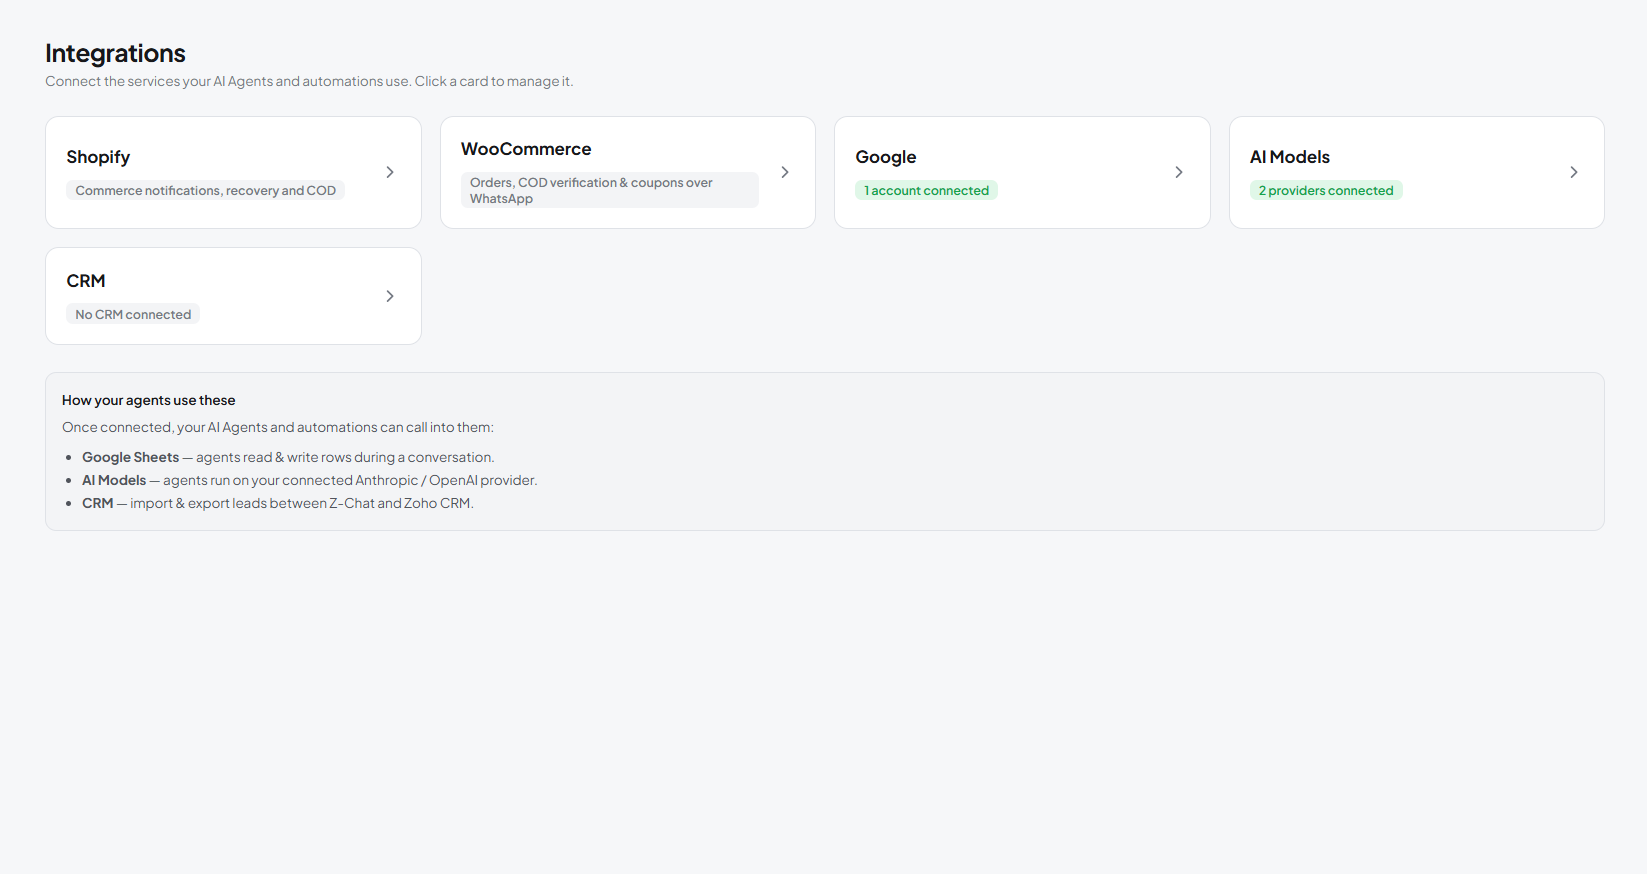 Figure 29. Integrations
| Card | What it does |
|---|---|
| Shopify | Commerce notifications, recovery, and COD. See Shopify. |
| WooCommerce | Orders, COD verification, and coupons over WhatsApp. See WooCommerce. |
| Google Sheets and Gmail for agents and automations. | |
| AI Models | The provider credentials your AI agents run on. |
| CRM | Zoho CRM, and an inbound CRM webhook. |
This section explains the following:
- To connect a Google account
- To save a Google Sheet for automations
- To connect an AI model provider
- To connect Zoho CRM
- To set up a CRM webhook
- To set up MCP tools
To connect a Google account
- Go to Settings > Integrations > Google.
- Select Connect your first Google account, or Connect another Google account.
- Sign in with the Google account and approve the permissions.
- You return to Zprox.Chat and a green confirmation names the connected account.
Important: Grant the Sheets and Drive permissions when Google asks. If you skip them, Zprox.Chat can't list your spreadsheets and shows a warning on the sheet picker.
To use Gmail nodes: The same account must grant Gmail permissions. If Gmail blocks are unavailable, reconnect the account and approve the Gmail scopes.
To disconnect: Select the disconnect action on the account and confirm.
To save a Google Sheet for automations
Save a spreadsheet and tab once, then pick it by name in the automation builder and in agent tools.
- Go to Settings > Integrations > Google.
- Select the connected account.
- Select the spreadsheet from the list, then select the tab.
- Type a friendly name, for example
Leads Tracker. - Select Save.
To remove a saved sheet: Select the remove icon on its row and confirm.
To connect an AI model provider
- Go to Settings > Integrations > AI Models.
- Select a provider, for example Anthropic Claude or OpenAI.
- Select Connect.
- Fill in:
- A label, for example
Production key - The API key
- A base URL, only if you use an OpenAI-compatible provider that needs one
- A label, for example
- Select Save.
Note: The key is stored encrypted with AES-256-GCM and never leaves your server in plaintext. One key serves every AI agent in the workspace.
On the provider page you can also see token usage and estimated cost once your agents, summaries, and automation AI steps start running.
To remove a key: Select the remove action and confirm.
To connect Zoho CRM
Zoho lets you push contacts to Zoho Leads and pull Zoho Leads into a WhatsApp account's contact list.
First, create an application in Zoho:
- In the Zoho API Console, create a Server-based Application.
- Copy its Client ID and Client Secret.
Then connect it in Zprox.Chat:
- Go to Settings > Integrations > CRM > Zoho.
- Paste the Client ID and Client Secret.
- Select the Data centre (region) that matches your Zoho account.
- Select the copy icon next to Redirect URI, and add that exact URI to your Zoho application.
- Select Save, then select Connect. Zoho opens and asks you to approve access.
- Approve. You return to Zprox.Chat and the connection shows as connected.
To export contacts to Zoho:
- On the Zoho page, choose the export target.
- Select Export. Contacts are pushed to Zoho Leads and deduplicated by phone number.
To import leads from Zoho:
- Choose the WhatsApp account the leads should belong to.
- Set the maximum number of records to pull.
- Select Import.
To set up a CRM webhook
Use this when another system should push leads into Zprox.Chat.
- Go to Settings > Integrations > CRM > Webhook.
- Copy the webhook URL. It carries a token unique to your workspace.
- Copy the signing secret and configure your sending system to sign each request with it.
- In the sending system, POST lead data to the URL.
- Back in Zprox.Chat, check the recent-deliveries list to confirm the requests arrive and are accepted.
To set up MCP tools
MCP lets an MCP client, such as Claude Desktop, manage your agents and forms.
-
Go to Settings > MCP Tools.
-
Under MCP access, turn access on.
-
Under Capabilities, choose what an MCP client may do:
Capability What it allows Discovery / read List WhatsApp numbers, models, spreadsheets, tabs, media, templates, and existing agents. Analytics / data (read-only) Read dashboard figures, leads, agent runs, automation runs and failures, broadcasts, and contacts. Create agents Create new AI agents. Update agents Edit existing agents. Configure tools Add or edit agent tools — Google Sheets and HTTP request. Delete Delete agents and remove tools. Send messages Send WhatsApp messages and approved templates to contacts. Important: Send messages performs real sends that Meta bills. Turn it on only if you're sure.
-
Under API keys, type a key label, for example
My MacBook — Claude Desktop, and select Create. -
Copy the key immediately. The full key is shown only once.
-
Paste the key into your MCP client as a bearer token.
To revoke a key: Select the remove action on the key row.