Automations
An automation is a flow that runs by itself: something happens, and Zprox.Chat does a series of steps. You build flows on a canvas by dragging in blocks and connecting them.
This section explains the following:
- To create an automation
- Understand the builder
- Block library reference
- To add and connect blocks
- To configure a block
- To test an automation step by step
- To save and activate an automation
- To review executions
- To import or export an automation
To create an automation
-
Select Automations in the sidebar. The list of automations appears.
-
Select New Automation.
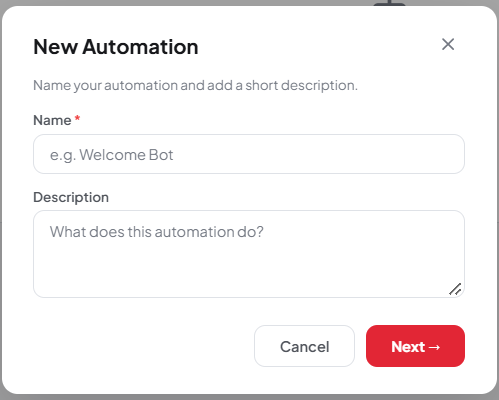 Figure 20. New automation
 -
In the Name box, type a name, for example
Welcome Bot. -
In the Description box, describe what the flow does. This is optional.
-
Select Create. The builder opens on an empty canvas.
Other actions in the list: Select the pencil icon to rename, the copy icon to duplicate, or the bin icon to delete an automation. Use the Search automations box to find one.
Understand the builder
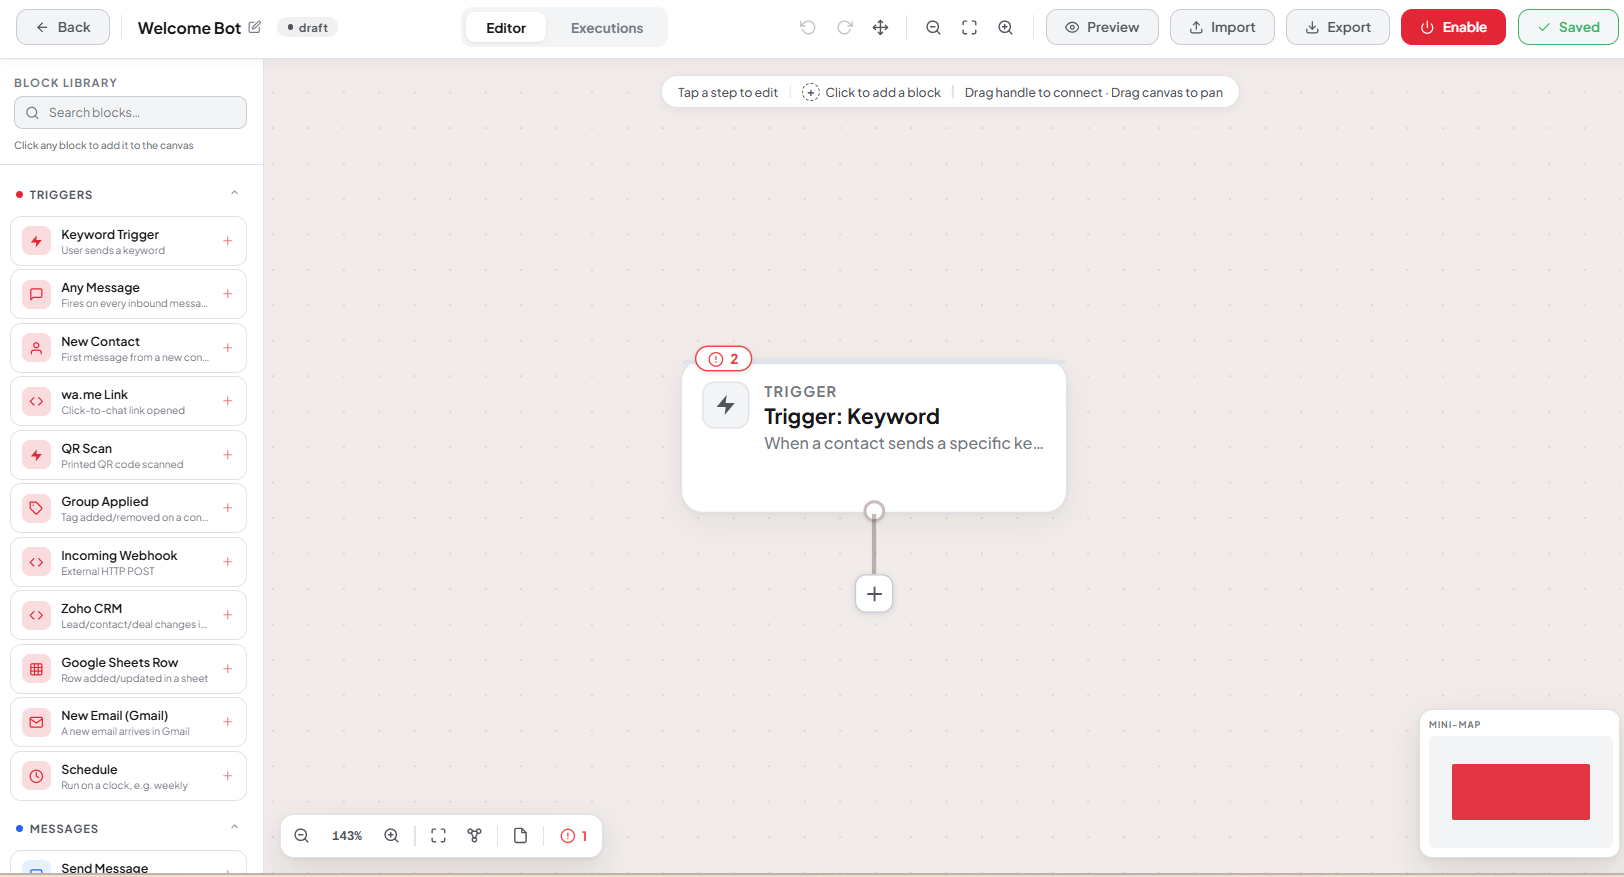 Figure 21. The automation builder
| Area | What it does |
|---|---|
| Block library (left) | Every block you can add, grouped by purpose. Use the search box to find one by name. |
| Canvas (centre) | Where your flow lives. Drag to pan, scroll to zoom. |
| Toolbar (top) | The flow name, its status, the Editor and Executions tabs, and the canvas controls. |
Toolbar controls, from left to right: Undo, Redo, Auto-arrange, Zoom out, Fit to screen, Zoom in, Import, Export, the activate switch, and Save.
On a phone: Select the blocks button in the lower-left corner to open the block library as a drawer.
Block library reference
Triggers
Every flow starts with exactly one trigger. The trigger decides when the flow runs.
| Block | Fires when |
|---|---|
| Keyword Trigger | The contact sends a specific keyword. You set the keyword, the match type, and whether case matters. |
| Any Message | Any inbound message arrives. |
| New Contact | A contact messages you for the very first time. |
| wa.me Link | Someone arrives through a tracked click-to-chat link. You set a tracking code and a pre-filled message. |
| QR Scan | Someone arrives by scanning a printed QR code. |
| Group Applied | A group is added to, or removed from, a contact. |
| Incoming Webhook | An external system sends an HTTP POST to the flow's URL. |
| Zoho CRM | A lead, contact, or deal changes in Zoho CRM. |
| Google Sheets Row | A row is added or updated in a connected sheet. |
| New Email (Gmail) | A new email arrives in the connected Gmail account. You can filter with a Gmail query. |
| Schedule | On a clock — by interval, daily, weekly, or monthly — at a time and timezone you set. |
Messages
| Block | What it does |
|---|---|
| Send Message | Sends a Meta-approved WhatsApp template to the contact. |
Logic
| Block | What it does |
|---|---|
| Condition | Splits the flow into a true branch and a false branch based on rules about the contact or the message. |
| Switch | Routes the flow to the first of many branches that matches. |
| Filter | Stops the flow unless the rules pass. |
| Loop | Runs a body flow once for each item in a list. You set the item variable and a maximum number of iterations. |
| Smart Delay | Pauses the flow for minutes, hours, or days. It can wait in the contact's own timezone. |
Data and code
| Block | What it does |
|---|---|
| Edit Fields | Sets values that later steps can use as {{variables}}. |
| Code | Runs a small sandboxed JavaScript snippet to transform flow data. |
| No-Op | Does nothing. Use it as a tidy merge point or a note pin. |
Actions
| Block | What it does |
|---|---|
| Add Tag | Adds a group to the contact. |
| Remove Tag | Removes a group from the contact. |
| Assign to BDA | Assigns the conversation to a team user. |
| Update Contact | Sets contact fields, including custom fields. |
| Update Lead Score | Adds or subtracts points, for example +10. This feeds the score column, the hot-lead segment, and the average-score metric. |
| Set Stage | Moves the lead to a lifecycle stage. |
API and integrations
| Block | What it does |
|---|---|
| API call | Sends an HTTP request to an external system. You set the method, URL, headers, and body, and what happens on an error. |
Google Sheets
| Block | What it does |
|---|---|
| Add Row | Appends a row to a sheet. |
| Update Row | Finds a matching row and updates it. It can create the row if it doesn't exist. |
| Get Rows | Looks up rows, with separate found and not found outputs. |
| Read Range | Reads a range of cells into a field. |
| Delete Row | Deletes a matching row. |
| Clear Sheet | Clears the data rows or a range. |
Gmail
| Block | What it does |
|---|---|
| Send Email | Sends an email from the connected Gmail account. |
| Reply to Email | Replies in the email thread that started the flow. Use it after a New Email (Gmail) trigger. |
AI
| Block | What it does |
|---|---|
| Handoff to AI Agent | Ends the flow and binds the conversation to an AI agent, which answers from then on. You can supply a short brief and choose whether the agent replies immediately. |
Workflows
| Block | What it does |
|---|---|
| Human Handoff | Hands the conversation to a live team member. You set who, the priority, an SLA, an internal note, and whether to notify by WhatsApp, email, or a task. |
| Trigger Another Flow | Runs a second automation, either waiting for it or continuing straight away. |
To add and connect blocks
- In the block library, find the block you want. Use the search box if the list is long.
- Drag the block onto the canvas, or select it to drop it at the centre.
- Point at a block's output handle, then drag to the input handle of the next block. A connector appears.
- To remove a connector, select it and press Delete.
- Select Auto-arrange to tidy the layout.
Note: Blocks such as Condition, Switch, and Get Rows have more than one output. Connect each output to the branch it should run.
To configure a block
- Select the block on the canvas. Its settings panel opens.
- Fill in the settings. The panel changes with the block type.
- To insert a value from an earlier step, select the variable icon in a text box and choose a field.
- Select Save at the bottom of the panel.
To rename a block: Select the pencil icon in the panel header. To duplicate a block: Select the copy icon in the panel header. To delete a block: Select the bin icon in the panel header.
Note: Warning and error icons on a block tell you something is incomplete — for example, a Condition with no rules. Fix these before you activate the flow.
To test an automation step by step
Zprox.Chat lets you feed a real message into the flow and run one block at a time.
- Select the trigger block. The test panel appears in its header.
- Choose how to get test data:
- Pull latest — uses the most recent matching message already in your inbox.
- Listen — waits for a new message to arrive. Send yourself a message from a phone. Select Stop to cancel.
- When data arrives, it's pinned to the trigger and shown in the panel.
- Select the next block, then select Execute node. The block runs with the pinned data and shows its output.
- Repeat for each block down the flow.
Important: Execute node runs for real. A Send Message block really sends a WhatsApp message, an API call really calls your system, and a Sheets write really changes your sheet. Zprox.Chat asks you to confirm with Run for real before any sending step.
To clear test data: Select Reset.
To save and activate an automation
- Select Save in the toolbar. Unsaved changes are indicated next to the button.
- Set the status switch to active. The status pill changes from Draft to the live state.
Note: A flow only runs when it's active and saved. Deactivate a flow to stop it without deleting it.
For an Incoming Webhook trigger, save and activate the flow first, then POST to the URL shown in the trigger's settings from cURL, Postman, or your own backend.
To review executions
- In the toolbar, select the Executions tab.
- Review the list of runs, each with its status — success, waiting, or error — and its start time.
- Select a run to see the path it took through the flow, and the input and output of each step.
Use this to find out why a flow stopped, or which step returned an error.
To import or export an automation
To export: In the builder toolbar, select Export. Zprox.Chat downloads the flow as a JSON file.
To import into an open flow: Select Import in the toolbar and choose a JSON file. The blocks are placed on the current canvas.
To import as a new automation: On the Automations list page, select the import button and choose a .json export file.
AI agents
An AI agent answers customers for you using a language model. It can reply on WhatsApp or Instagram, look things up in a Google Sheet, call your own API, send media, and hand the conversation to a person when it gets stuck.
This section explains the following:
- To create an AI agent
- To choose a channel and account
- To choose an AI model
- To set the trigger
- To write the behavior prompt
- To give the agent media
- To add tools
- To set up human handoff
- To turn on auto-summary on close
- To let the agent answer Instagram comments
- To activate an agent
- To review agent runs
Before you start: Connect an AI model provider in Settings > Integrations > AI Models. See To connect an AI model provider.
To create an AI agent
-
Select AI Agents in the sidebar.
-
Select New agent. The agent editor opens.
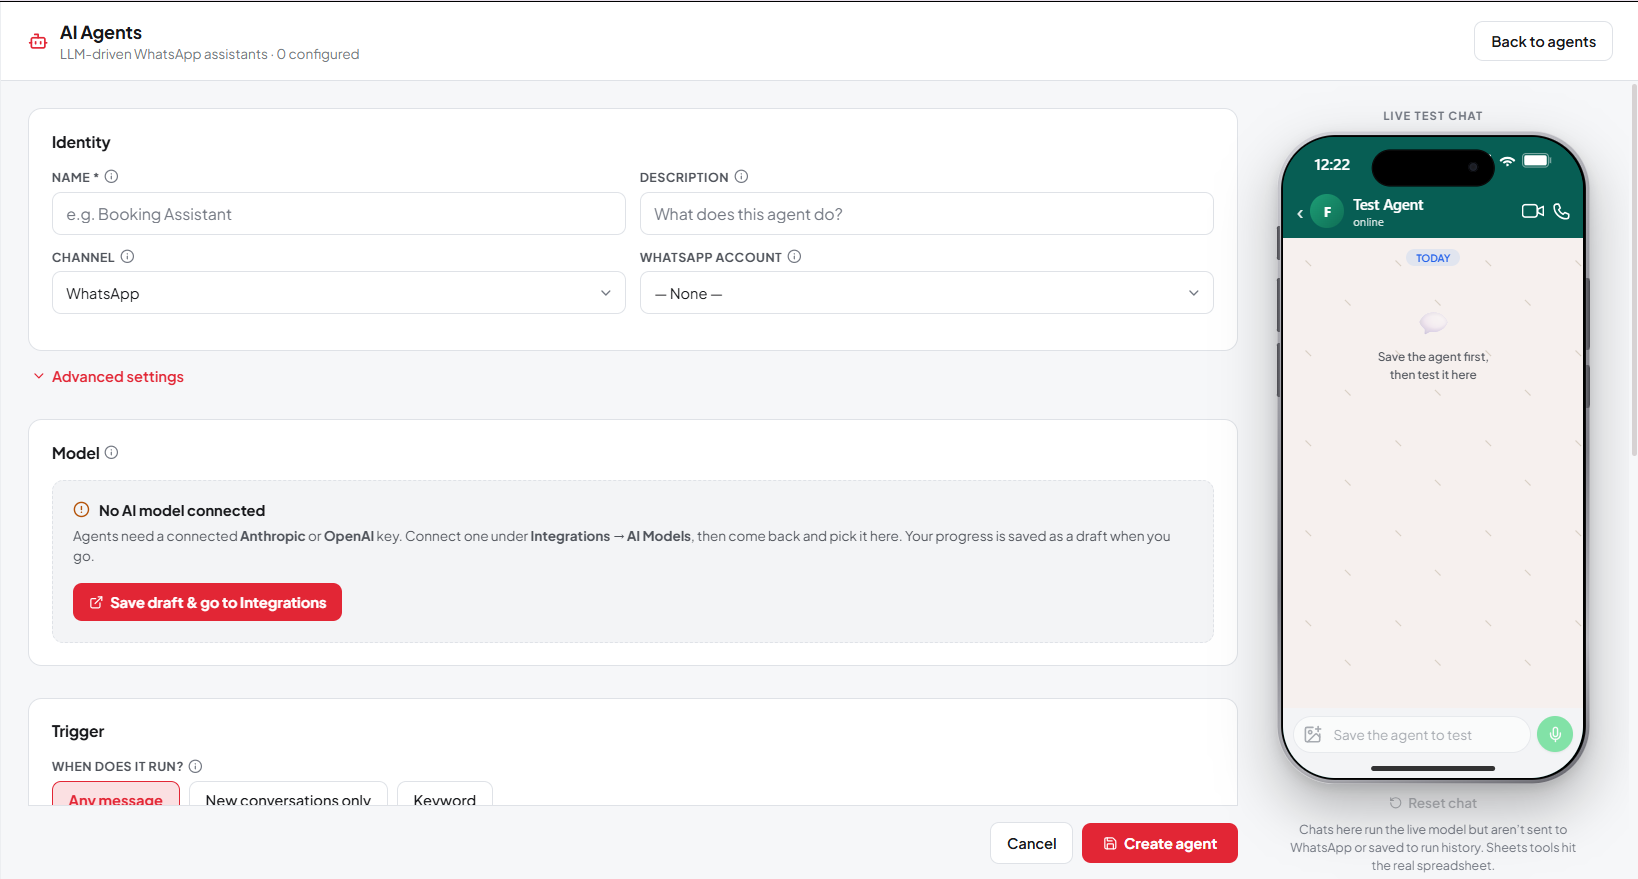 Figure 22. AI agent editor
 -
Under Identity, fill in:
- Name — shown only in your agents list. The customer never sees it.
- Description — an optional note about what the agent does.
To choose a channel and account
- Under Identity, select a Channel:
- Select the account the agent answers on:
- For WhatsApp, select the WhatsApp account. Media the agent sends is read from that number's media library.
- For Instagram, select the Instagram account. Replies are text and media, inside Instagram's 24-hour window.
Note: Only one agent can be active per account for each trigger type.
To choose an AI model
- Under Model, select an AI Model. This is the connected provider credential.
- Select the Model to call. You can pick a listed model, or type a custom model ID to use a newer model the provider offers.
- Set Temperature. Lower values give more predictable answers; higher values give more varied ones.
- Under the advanced options, set:
- Context window (messages) — how many recent messages are sent to the model each turn. More memory costs more per reply.
- Max tool iterations — the hard cap on tool calls while handling one message. This stops runaway loops.
Note: API keys live in Integrations > AI Models, never on the agent.
To set the trigger
Under Trigger, choose when the agent runs:
| Trigger | What it does |
|---|---|
| Any message | Replies to every inbound message on its account. Only one any-message agent can be live per account. |
| New conversations only | Engages a contact on their first-ever message, then keeps replying in that conversation. Only one new agent can be live per account. |
| Keyword | Engages when a message matches a keyword. You can have several keyword agents live at once. |
To write the behavior prompt
Under Behavior, type the system prompt. This is the instruction the model receives on every turn.
Write it as plain instructions. For example:
You are a helpful WhatsApp assistant for Acme Inc.
Answer questions about our pricing and delivery times.
Keep replies under three sentences.
If the customer asks for a human, say you are connecting them.
Tip: State what the agent must not do as well as what it should do. Tell it to hand off rather than guess when it doesn't know.
To give the agent media
Media groups let the agent send files during a conversation, such as a price list or a brochure.
- Under Media, select Add group.
- Type a description that says when to send this group, for example
Send when the customer asks for pricing. - Add one or more files from the media library.
- Repeat for each group.
The agent chooses the group that fits and sends every file in it.
To add tools
Tools let the agent read and write data mid-conversation. Save the agent once before you attach tools.
-
Under Tools, select Add tool.
-
Choose a tool type:
Tool What it does Setup Google Sheets Reads or writes rows in a connected sheet. Choose the saved sheet, then pick Look up rows, Add or update a row, or Always add a new row. Map the columns. HTTP request Calls an external API or device. Set the method, URL, headers, and body. Lead form Sends one of your forms and collects the answers. Choose the form. -
Fill in the settings and select Save.
Note: Prefer Add or update a row over Always add a new row — the second one creates duplicates.
To set up human handoff
- Under Human handoff, turn on handoff.
- Under Hand off to (round-robin), select the team members who should receive conversations. Zprox.Chat assigns them one by one across the people you pick.
- In Handoff keywords (optional), type comma-separated words that should force a handoff, for example
human, agent, talk to someone.
A team member can also take over manually from the chat header. See To take over from an AI agent.
To turn on auto-summary on close
- Under Auto-summary on close, turn the option on.
- Set the Idle window (minutes) — how long with no new messages before the conversation counts as closed.
When the window passes, the agent writes a summary of the conversation. The summary appears in the AI Summary column in Lead Studio, and is written to your connected sheet or CRM if you configured one.
To let the agent answer Instagram comments
For an Instagram agent, you can also have it reply to comments on your posts and reels.
- Under Instagram comments, turn the option on.
- Under Which posts?, choose all posts and reels, only reels, only posts, or specific posts you select.
- Under How should it reply?, choose:
- Public reply — posts a reply on the comment for everyone to see.
- DM — opens a private message to the person who commented.
- Both — does each.
Note: Comment-to-DM automations answer first. The agent only handles comments the automations don't match.
To activate an agent
- Select Save.
- Set the activate switch to on.
Note: The switch stays unavailable until you've selected a connected AI model.
To review agent runs
- Open the agent.
- Select the runs view. Each run shows the message that triggered it, the tools the agent called, the reply it sent, and any error.
To export an agent: In the editor header, select the download icon. Zprox.Chat saves the agent as a JSON file. To import an agent: On the agents list, select Import and choose the JSON file. The agent is created as a draft for you to review.